Under-extrusion troubleshooting: gaps, thin walls, and weak layers
Find why your printer lays down too little plastic: check filament, temperature, flow and speed settings, and the feed path before buying parts.
On this page (11 sections)
Under-extrusion means less plastic comes out of the nozzle than the slicer expects, which leaves gaps, thin walls, and weak layers. Most cases trace back to something you can check for free, so start from your printer maker's profile for your exact nozzle and filament, and print with a fresh or dried spool to rule out wet filament. Then check for a nozzle temperature too low for the speed you're printing, a wrong filament diameter or flow setting, or a speed that asks for more plastic than the hotend can melt. If your exact filament isn't in PrusaSlicer, Prusa suggests trying a print temperature adjustment of "+/- 5-15°C," but don't go outside the range on the spool or data sheet. Change one thing per test print. Look at the feed path, extruder, and nozzle after that. Most fixes don't need new parts.
Quick checks
| Symptom | First check | Typical first change |
|---|---|---|
| Popping, bubbles, rough surface | Wet filament | Swap to a fresh or dried spool |
| Gaps everywhere, steady extrusion, no noises | Filament diameter and profile | Match the slicer's diameter to the spool, then run a flow ratio test |
| Gaps only on fast sections or large infill | Speed against what the hotend can melt | Slow down as a test, then run a max volumetric speed test |
| Gaps at random points on fast prints | Nozzle temperature | Stay in the spool's range; "+/- 5-15°C" for filaments not in PrusaSlicer (Prusa) |
| Light clicking from the extruder | Drive gears and idler (printer off) | Clean the gears and check idler tension per the maker |
| Loud clicking, or little comes out when loading | Clog | Manual extrusion test, then clog diagnosis |
This guide is for anyone whose prints look starved: gappy walls, see-through top layers, or parts that snap along the layer lines. It lists the causes from cheapest to check to most involved, explains how to tell plain under-extrusion from a clog, and points to the calibration tests that slicer and printer makers publish.
What does under-extrusion look like?
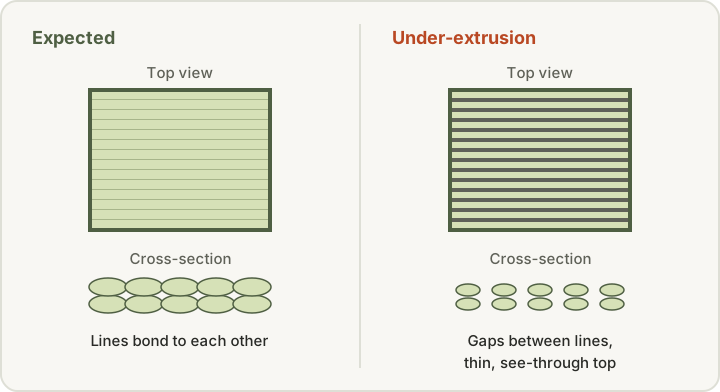
Simplify3D defines it as "less plastic exiting the nozzle than what the software expects," which shows up as gaps between neighboring lines. Prusa describes it as "material missing in your print's layers" and warns that such parts "can be fragile and tend to break apart." Common signs:
- Gaps between perimeters or between the walls and the infill. Our gaps between perimeters guide covers the slicer side of wall gaps.
- Thin or see-through top layers, with visible lines or holes.
- Walls thinner than the slicer intended, so parts feel flimsy.
- Weak layers that split apart under light force.
- Missing lines or missing layers partway up a print. Polymaker calls this "temporary under extrusion."
When it happens matters. Under-extrusion over the whole print points toward a setting, the filament, or the extruder. Under-extrusion that comes and goes, or only on fast sections, points toward speed, temperature, or something in the feed path. Neither is proof on its own.
Simplify3D suggests a simple check: print a small cube with at least three perimeters, then look at the top to see whether the perimeters bond to each other or leave gaps. Use the same test file before and after each change.
Step 1: Start from a known-good profile
Prusa's under-extrusion articles recommend the stock slicer profiles for your machine as a starting point, noting that each one "contains settings that determine temperature, speeds, and how much filament the 3D printer should extrude." Pick the profile for your exact printer, nozzle size, and filament type. If you've been tweaking settings, go back to the stock profile and print your test cube as a baseline.
Check that the nozzle in the slicer matches the nozzle on the printer. Prusa warns that "using a standard profile for an HF nozzle (or vice versa) throws off the volumetric flow calculations, which can lead to severe under-extrusion or structural clogs."
Step 2: Rule out wet filament
Moisture is cheap to test for. Polymaker explains that absorbed moisture "turns into steam when the filament is heated in the hotend," which disrupts extrusion. Signs it lists include popping or hissing at the nozzle, bubbling, weak or brittle layers, and "weakened, inconsistent, or even pitted extrusion." Polymaker names nylon, PVA, TPU, and PETG as particularly prone to absorbing moisture. Prusa says damp filament hurts printing "especially soluble filament, PETG, and ABS."
Safe checks:
- Swap spools. Print the test cube with a freshly opened or recently dried spool of the same kind of material. If the gaps go away, moisture is a strong suspect.
- Dry according to the filament maker. Use the temperature and time the maker publishes for that exact product. Settings vary by brand and blend.
- Store it properly afterward. Prusa recommends keeping spools in their original bag with silica gel when not in use.
No purchase is needed to run this test. If moisture turns out to be a recurring problem, our dryer vs dry box guide and filament storage guide explain the options.
Step 3: Check temperature against speed
Plastic needs time and heat to melt. Polymaker says printing too cold "can cause too little of filament to extrude," and that this can happen at random points in a print because "the hotend doesn't have enough time to heat the material when going at its top speeds." It also suggests checking that the part cooling fan isn't blowing on the heater block and pulling its temperature down. If the hotend can't hold its set temperature, see our nozzle temperature fluctuating guide.
What to try, one change at a time:
- Stay inside the filament maker's range. If your exact filament isn't in PrusaSlicer, Prusa suggests trying a print temperature adjustment of "+/- 5-15°C." Don't go outside the range printed on the spool or the data sheet.
- Slow down as a test. Polymaker suggests lowering the speed (or the feed-rate setting on the printer screen, if it has one) to see whether the problem eases.
- Don't push ordinary filament at high speed. For the K1 series, Creality lists "printing with ordinary consumables in high-speed mode" as a cause of incomplete filling. It suggests avoiding high-speed mode with ordinary filament, or using filament made for high-speed printing.
- Watch the room temperature on enclosed printers. Prusa warns that on its enclosure with the doors closed, if the room is over 27 °C, the inside "may be too high for printing PLA or similar materials, causing under-extrusion or clogging."
Step 4: Confirm filament diameter and flow settings
Filament diameter
Simplify3D says the first thing to verify is "that the software knows the filament diameter that you are using." Polymaker notes the two common standards are 1.75 mm and 2.85 mm. If the slicer is set to the wrong one, the amount of plastic it asks for will be wrong on every line.
Prusa adds that some filaments vary in thickness, because of quality or added materials such as wood, and gives the industry standard for diameter variation as "+/- 0.05 mm."
Flow ratio or extrusion multiplier
Every slicer has a setting that scales how much plastic is extruded. Simplify3D calls it the extrusion multiplier, PrusaSlicer calls it the extrusion multiplier, and OrcaSlicer calls it the flow ratio. OrcaSlicer's wiki says a flow ratio that's too low "causes under-extrusion, which leads to gaps, weak layers, and poor structural integrity."
Only adjust flow after you've ruled out wet filament, temperature, and diameter. Raising flow to hide a feed problem treats the symptom, not the cause.
Step 5: Run the calibration tests
Slicer makers publish structured tests so you don't have to guess.
Flow ratio test
OrcaSlicer's flow ratio calibration prints a set of small blocks, each with a different flow modifier. You pick the block with the smoothest top surface and no gaps between lines, then update the filament profile. For its recommended "YOLO" method, the new value is the old flow ratio plus or minus the chosen modifier. For example, OrcaSlicer's wiki shows a flow ratio of 0.98 with a chosen modifier of +0.01 becoming 0.99. The wiki also warns Bambu Lab owners not to select the printer's "Flow calibration" option during this procedure.
Prusa's extrusion multiplier article offers a visual method (adjust in 1–2% steps until the top layer looks smooth) and a measured method using wall thickness and calipers. Prusa describes this as "advanced calibration, recommended only to experienced users," notes that "cheap digital calipers may not be accurate enough," and says its numbers apply to the default 0.4 mm nozzle profiles. Follow the article for your setup.
Max volumetric speed test
Max volumetric speed caps how much plastic per second the slicer will ask for, regardless of the speed settings. OrcaSlicer's wiki says the right value "varies depending on your material, machine, nozzle diameter, and even your extruder setup," and that even brand and color can change it.
Its test prints a model that steadily increases flow with height. You measure the height where quality starts to fail and calculate the limit. With the default settings (5 mm³/s start, 0.5 step), a failure at 19 mm works out to 5 + (19 × 0.5) = 14.5 mm³/s. OrcaSlicer calls this "a best case scenario" and suggests reducing the result by 10–20% or more for print quality and strength. It also recommends a temperature toward the higher end of the filament's range if you plan to print faster.
If your under-extrusion only shows up on fast sections, this is the test to run.
Step 6: Check the feed path, extruder, and tube
If settings and filament check out, look at the mechanics. Power off and unplug the printer before you open anything.
- Tangled spool or a stiff feed path. Creality's K1 troubleshooting starts with "filament entanglement" at the spool or at the PTFE tube inlet. Make sure the spool turns freely and the filament slides easily through its tube.
- Dirty or misaligned drive gears. For its MK3-family printers, Prusa says to "check both Bondtech gears for any dirt or misalignment." Creality's K1 page recommends a soft brush for filament debris on the gear and replacing the extruder assembly if the gear is damaged or deformed.
- Idler tension. In the same MK3-family guide, Prusa warns that "having the idler screw too loose or too tight can cause under extrusion." Check your maker's guide for the correct setting before changing it.
- Loose drive gear. Polymaker notes that the gear on the extruder motor shaft is often held by a small set screw. If that screw slips, the motor turns but the gear doesn't, which can cause gaps or no extrusion at all.
- Bowden tube gap. On hotends that aren't all-metal, where a PTFE tube runs down into the hotend, Polymaker says a tube not pushed all the way in "can cause minor clogs or issues that can lead to gaps in your layers." For the K1, Creality says that if filament pulled out of the hot extruder has a mushroom-shaped tip, the PTFE tube should be replaced. Seat or replace tubes only by your maker's procedure.
- Nozzle too close on the first layer. Prusa notes that if the nozzle is too close to the bed, "the filament can be obstructed from pushing through." That usually shows up as thin or missing first layers and a clicking extruder. If no plastic comes out at the very start of a print, our no extrusion at print start guide covers that case.
Under-extrusion or a clog?
The two overlap, and a partial clog is one cause of under-extrusion. These clues help separate them:
| What you notice | Points more toward |
|---|---|
| Gaps everywhere, steady extrusion, no noises | A setting: diameter, flow, or profile mismatch |
| Gaps only on fast sections or large infill areas | Speed or volumetric limit beyond what the hotend can melt |
| Popping, bubbles, rough surface | Wet filament |
| Light clicking from the extruder | Gearing (Prusa) |
| Loud clicking from the extruder | Clogged or deformed nozzle (Prusa) |
| Filament curls up and sticks to the nozzle, or little or nothing comes out when loading | Partial or full clog (Prusa) |
| Mushroom-shaped tip on filament pulled from the hot extruder | A PTFE tube that needs replacing (Creality, K1) |
The deciding test is manual extrusion at the material's normal printing temperature through the printer's menu. If plastic flows freely and straight down, a hard clog is unlikely and the problem is more likely settings, filament, or feed. If it curls, sputters, or won't flow, follow our clog diagnosis guide and your printer maker's unclogging procedure.
Polymaker also says to rule out heat creep or a nozzle clog before raising the temperature to fix a skipping extruder. If heat creep is causing a clog, it says "increasing your extrusion temperature will only make the problem worse."
A sensible test order
- Reset to your printer maker's profile for your exact printer, nozzle, and material. Confirm the nozzle type matches.
- Print a small test cube as a baseline.
- Swap to a fresh or dried spool. Compare.
- Check temperature and slow the print as a test.
- Confirm filament diameter in the slicer.
- Run the flow ratio test, then the max volumetric speed test if the problem is speed-related.
- Check the spool, feed path, extruder gears, idler, and tube with the printer off and unplugged.
- Test manual extrusion. If it fails, move on to clog diagnosis.
Write down each change and its result. One change per print is slower, but it's the only way to know what fixed it.
When should you hold off on buying parts?
Hold off on a new nozzle, hotend, or extruder if:
- You haven't tried a dry, known-good spool yet. It's the cheapest test.
- Your profile doesn't match your nozzle or filament. Go back to the maker's profile first.
- The problem only appears at high speed. Lower the speed or set a max volumetric speed before blaming hardware.
- You haven't run a flow ratio test.
- The extruder gear is just dirty. Cleaning it costs nothing.
Parts make sense when your maker's checks point to them: a damaged drive gear, a PTFE tube that keeps producing mushroomed tips, or a nozzle that stays clogged after your maker's cleaning procedure. Our worn nozzle guide explains how to tell wear from a clog. Match any replacement to your exact printer and hotend. Our replacement nozzle guide and the Nozzles: what to check before you buy ↗ explain how. If moisture is the recurring cause, see the Dryers & dry boxes: what to check before you buy ↗.
If your prints have hairs and blobs rather than gaps, see our stringing guide instead.
Sources
- Under-extrusion (Nextruder printers), Prusa Research
- Under-extrusion, Prusa Research
- Clogged nozzle (CORE One, CORE One L, XL, MK4/S, MK3.9/S), Prusa Research
- Extrusion multiplier calibration, Prusa Research
- Under-extrusion (Print Quality Guide), Simplify3D
- Flow ratio calibration, OrcaSlicer project wiki
- Max volumetric speed calibration, OrcaSlicer project wiki
- Filament Feeding Issue/Clogging Issue (K1 series), Creality (Creality Wiki)
- K1 Incomplete model filling, Creality (Creality Wiki)
- Missing layers and holes in prints, Polymaker
- Extruder motor skipping/clicking, Polymaker
- Wet filament, Polymaker
This page is research-based: we have not tested the products or methods ourselves. It draws on the manufacturer documentation and sources listed. Exact settings and fit always defer to your printer and filament makers.
Keep reading

Is your nozzle clogged? Symptoms, causes, and safe fixes by printer
Tell a true nozzle clog from a tangled spool, slipping extruder, heat creep, or settings problem, then follow your printer maker's unclogging steps.

Stringing troubleshooting: moisture, temperature, and motion settings
How to diagnose stringing and oozing one change at a time: check filament moisture, nozzle temperature, retraction, and travel settings before buying parts.

Filament dryer vs dry box: drying and storage explained
A dry box keeps dry filament dry; a dryer removes moisture that is already in it. How to tell which problem you have, and what to do safely.