Stringing troubleshooting: moisture, temperature, and motion settings
How to diagnose stringing and oozing one change at a time: check filament moisture, nozzle temperature, retraction, and travel settings before buying parts.
On this page (12 sections)
Stringing is plastic oozing out of the nozzle while it travels between parts of a print, and the most common causes are filament that has absorbed moisture and a nozzle temperature at the hot end of (or above) what the material needs. Start from your printer maker's profile for the exact material, then try a fresh or dried spool. If strings remain, both Prusa and Simplify3D suggest trying a nozzle temperature 5–10 °C lower, and Simplify3D gives 0.5–2.0 mm as typical retraction for direct drive. Treat those as starting steps, not rules, and stay within the range on your spool. Retraction and travel settings that don't suit your extruder are the next suspects. Check moisture, temperature, retraction, and travel in that order, changing one thing per test print. New parts are rarely the first answer.
Quick checks
| Symptom | First check | Typical first change |
|---|---|---|
| Strings on one spool but not another | Moisture: swap to a fresh or dried spool | Dry per the filament maker's instructions |
| Hairs across the whole print | Nozzle temperature against the spool's range | 5–10 °C lower (Prusa, Simplify3D), within the spool's range |
| Strings on a direct drive printer | Retraction length | Run a retraction test; 0.5–2.0 mm is typical (Simplify3D) |
| Strings on a Bowden printer | Retraction length | Run a retraction test; longer retractions are typical |
| Strings only across long open travels | Travel settings | Turn on avoid crossing perimeters or combing |
| Blobs at line ends or travel starts | Pressure or linear advance | Calibrate it per your printer or slicer maker |
| Still heavy at the top of a retraction tower | Filament and nozzle | Dry the filament and check the nozzle install (OrcaSlicer) |
This guide is for anyone seeing hairs, webs, or blobs on otherwise decent prints. It explains what each symptom tends to point to, the checks worth doing first, and when a hardware problem is genuinely worth investigating.
What does stringing look like?
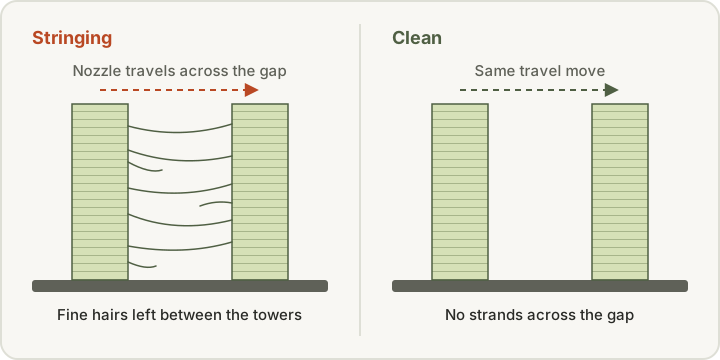
Stringing is a family of related symptoms rather than a single defect. Simplify3D describes it as "small strings of plastic" left behind on a model when plastic leaks from the nozzle during travel moves. In practice you may see:
- Fine hairs or "wisps" stretched between separate features, such as two towers or the posts of a test model.
- Thicker strings or webs that need trimming, often bridging a gap the nozzle crossed many times.
- Blobs or zits on the surface where the nozzle paused, started a line, or finished one.
- Oozed plastic inside hollow areas that never shows on the outside.
- Stringing that gets worse higher up the print, or only on certain colors or spools.
The pattern matters. Hairs everywhere on one spool but not another hints at the filament. Blobs only at the seam hints at start-and-stop behavior. Strings only across long open travels hints at travel settings. None of these is conclusive on its own, which is why the checks below go one at a time.
Step 1: Start from a known-good profile
Before changing any setting, make sure you're printing with the slicer profile your printer maker provides for your exact printer, nozzle size, and material type. Manufacturer profiles already account for the extruder design, and many stringing problems trace back to a profile meant for a different machine, an old custom tweak, or a generic material preset used for a filament that behaves differently.
If you've been experimenting, reset to the stock profile and print a small stringing test. That gives you a baseline. Every change after that should be compared against it.
Step 2: Check the filament for moisture
Moisture is one of the most common, and most overlooked, causes. Prusa's stringing article says plainly that filament "might have gathered moisture, which will cause a lot of stringing," and suggests trying a different spool to see whether the problem follows the filament.
Signs that moisture may be involved, according to Prusa's drying guide, include poor surface quality, blobs, weak layer bonding, and "bubbling and smoke during extrusion." You might also hear popping or crackling at the nozzle. The same guide singles out polyamide (nylon), PVA, and TPU as filaments more often in need of drying than PLA.
Safe checks, in order:
- Swap spools. Print the same test with a freshly opened or recently dried spool of a similar material. If stringing drops sharply, moisture is a strong suspect.
- Think about storage. A spool left out for weeks in a humid room is more suspect than one kept sealed with desiccant.
- Dry according to the manufacturer. Use the filament maker's drying temperature and time where published. Prusa's guide gives a per-material table and warns that "it is important not to exceed these temperatures while drying the filament." Settings vary by exact product, so don't borrow a number from a different brand or blend.
If drying helps, the longer-term fix is storage. Our filament storage guide and dryer vs dry box comparison cover the options.
Step 3: Tune nozzle temperature with a tower
Hotter plastic is runnier, so it oozes more readily. Prusa lists "very high printing temperatures" as a primary cause, and both Prusa and Simplify3D suggest trying a nozzle temperature 5–10 °C lower. Treat that as a starting step taken from their guides, not a rule, and never go below the range printed on your spool or in the filament's data sheet.
A temperature tower is the most efficient way to do this. OrcaSlicer's calibration wiki describes it as a test print with sections at different temperatures, and notes that "lower temperatures typically reduce stringing." It also points out the trade-off: temperature affects layer bonding, overhangs, and surface finish too. If several sections look good, OrcaSlicer suggests using the middle of that range, or the higher end if you print fast.
A few cautions:
- Too cold can cause under-extrusion, weak layers, and clicking extruders. Fixing stringing by making parts brittle is not a win.
- High-speed or high-flow profiles often need more heat, so a lower temperature may only work at lower speeds.
- Change temperature by itself first. If you lower temperature and change retraction in the same print, you won't know which one helped.
Step 4: Check retraction for your extruder type
Retraction pulls filament back slightly before a travel move to relieve pressure in the nozzle. The right amount depends heavily on the extruder design, which is why universal numbers are unreliable.
Direct drive vs Bowden
On a direct drive setup, the extruder motor sits right above the hotend, so a small retraction acts quickly. On a Bowden setup, the filament is pushed through a long tube, and some of the retraction is absorbed by slack, so longer retractions are typical.
To show how much the ranges differ between sources:
- Prusa's stringing guide says retraction length on its direct drive printers (MK2.5/S, MK3/S/+) "should be a maximum of 2 mm," while its Bowden MINI/MINI+ presets default to 3.2 mm. Those figures apply to those Prusa machines.
- Simplify3D's guide gives 0.5–2.0 mm as typical for direct drive and says Bowden setups may go "as high as 15mm."
- OrcaSlicer's retraction test defaults to sweeping 0–2 mm for direct drive and suggests 1–6 mm for Bowden.
These are starting ranges for calibration, not settings to copy. Your printer maker's profile is the better baseline.
Calibrate rather than guess
OrcaSlicer's retraction calibration prints a tower in which each section uses a different retraction length; you pick the section with the least stringing. Its wiki also makes a useful point: if stringing is still heavy at the top of the tower, dry the filament and check the nozzle installation rather than pushing retraction further.
Retraction speed matters too. Simplify3D notes that too slow a retraction allows oozing, while too fast can grind the filament. Prusa says higher speeds generally help, but excessive speeds risk skipped motor steps.
Step 5: Adjust travel behavior
Even with good retraction, some ooze happens during travel. Slicers have settings that change where and how the nozzle travels:
- Avoid crossing perimeters / avoid crossing outlines. Prusa and Simplify3D both recommend enabling the option in their software that keeps travel inside the part where possible, so less ooze ends up across open air or visible surfaces.
- Combing (Cura). Cura's own setting description says combing "keeps the nozzle within already printed areas when traveling," which reduces the need for retractions at the cost of slightly longer travel. You can limit it so it doesn't comb over top and bottom skins.
- Wipe while retracting. Prusa recommends leaving this option on in PrusaSlicer; it moves the nozzle while retracting to wipe off residual plastic.
- Only retract when crossing perimeters, minimum travel after retraction, and Z lift. Prusa explains that these trade print time and surface quality against stringing. For example, it says lower lift values help with stringing, but disabling lift risks the nozzle hitting the print.
- Travel speed. Simplify3D suggests faster X/Y travel so the nozzle spends less time over open gaps, within what your printer maker supports.
Model layout matters too. Printing several small parts far apart creates long open travels. Grouping them closer, or printing one at a time where your slicer and printer support it, can reduce strings.
Material-specific tendencies
PETG
Prusa's PETG guide calls the material "prone to stringing" and suggests "higher retractions and lower nozzle temperature" while using PrusaSlicer's profiles as the base. It also notes that part cooling helps with stringing and oozing. PETG blends differ by manufacturer, so a profile tuned for one brand may not transfer. Our PETG printing problems guide covers PETG-specific fixes. See our PLA vs PETG guide and the PETG: what to check before you buy a spool ↗ for more on the material.
TPU and other flexibles
Flexible filaments compress and stretch, which makes long retractions unreliable. Prusa's flexible materials guide says "it's alright to turn the retractions off completely and then try to raise them and watch the results," and that lower retraction reduces the risk of clogs and tangles. It also warns that flexible filaments "tend to absorb moisture and can be hard to print when wet." Hardness grades vary widely, so check our TPU compatibility guide before assuming a profile fits.
PLA
OrcaSlicer's retraction wiki describes PLA and ABS as filaments with minimal oozing. It says retraction settings can be highly effective when testing them, and that if the retraction tower looks clean from the start, a retraction length of 0.2–0.4 mm should suffice. If PLA strings heavily, moisture, an over-hot profile, or a profile mismatch are worth checking before anything else. Our PLA printing problems guide covers other PLA-specific fixes.
Could the nozzle or hotend be the cause?
If you've worked through moisture, temperature, retraction, and travel and stringing persists across several spools, hardware becomes more plausible:
- Residue in the nozzle. Prusa notes that printing one material for a long time, such as PETG, can leave a thin layer inside the nozzle, and recommends cleaning the nozzle thoroughly so remnants of previous filaments are removed.
- A partial clog or worn nozzle. These can cause inconsistent flow and blobs as well as strings. They usually show other symptoms too, such as under-extrusion or thin lines.
- Hotend assembly or heat-transfer problems. Prusa lists heat dissipation issues and incorrect hotend assembly among stringing causes on its printers. The fix depends entirely on the hotend design.
Follow your printer maker's documented procedure for any nozzle cleaning, cold pull, or nozzle change, with the printer in the state the procedure specifies. Hot nozzles cause burns, and the right torque and temperature for a nozzle swap vary by hotend.
Pressure and linear advance
Many modern firmwares and slicers include a feature that compensates for pressure building and releasing in the nozzle, called pressure advance or linear advance depending on the platform. When it's poorly tuned for a material, the ends of lines and the starts of travels can show blobs or small strings. If your printer uses one of these features, follow your printer maker's or slicer's calibration procedure for it, and only after the basics above are settled.
A sensible test order
- Reset to your printer maker's profile for your exact printer, nozzle, and material.
- Print a small stringing test as a baseline.
- Swap to a fresh or dried spool. Compare.
- Run a temperature tower within the spool's range.
- Run a retraction test suited to your extruder type.
- Adjust travel options one at a time.
- Only then inspect the nozzle and hotend per the manufacturer's instructions.
Write down each change and the result. One change per print is slower, but it's the only way to know what actually helped.
When should you hold off on buying parts?
It's tempting to order a new nozzle, hotend, or extruder when strings appear. Hold off if:
- The problem started with a new spool, or a spool that's been open a long time. Drying or swapping it is a cheaper test.
- You're using a custom or borrowed profile. Go back to the manufacturer's profile first.
- You haven't run a temperature or retraction test yet.
- The stringing is light and brushes off. Careful trimming once the part is off the printer may be all a decorative part needs.
A filament dryer is worth considering if you confirm moisture is a recurring problem, especially with TPU, nylon, or PETG; see the Dryers & dry boxes: what to check before you buy ↗. A replacement nozzle is worth considering if your printer maker's checks point to wear or damage. Our guide to choosing a replacement nozzle explains how to match one to your exact hotend, and the replacement nozzles shortlist is there if you do need one.
If stringing came with other problems at the start of the print, our first-layer adhesion guide may also help.
Sources
- Stringing and oozing, Prusa Research
- Stringing or oozing (Print Quality Guide), Simplify3D
- Retraction calibration, OrcaSlicer project wiki
- Temperature calibration, OrcaSlicer project wiki
- Drying filament, Prusa Research
- PETG material guide, Prusa Research
- Flexible materials, Prusa Research
- Cura printer setting definitions (fdmprinter.def.json), UltiMaker Cura project
This page is research-based: we have not tested the products or methods ourselves. It draws on the manufacturer documentation and sources listed. Exact settings and fit always defer to your printer and filament makers.
Keep reading

Filament dryer vs dry box: drying and storage explained
A dry box keeps dry filament dry; a dryer removes moisture that is already in it. How to tell which problem you have, and what to do safely.

Filament storage: sealed containers, desiccant, and moisture exposure
How to keep opened spools dry with sealed containers, the right desiccant and a hygrometer, and why storage cannot fix filament that is already wet.

PLA vs PETG: Choosing for the Actual Project
How to choose between PLA and PETG by what the part has to do: heat, stiffness, toughness, print ease, stringing, and build-plate release.