Elephant's foot: why the bottom of a print flares out, and how to fix it
Why the first layers of a print bulge outward, and how to check Z offset, bed temperature, and slicer compensation one change at a time.
On this page (11 sections)
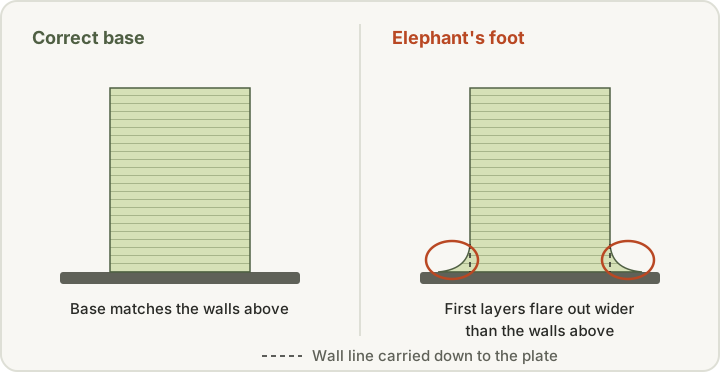
Elephant's foot is a flared lip around the bottom of a print, where the first layer (and sometimes the next few) comes out wider than the walls above. The most common cause is a nozzle set too close to the bed on the first layer, so check Z offset first and raise it in small steps. Next, check the bed temperature against the filament maker's range. A bed hotter than the material needs keeps the base soft; Polymaker, for example, says not to print PLA on a plate hotter than 60 °C. The weight of the part pressing down on a base that hasn't set yet adds to the flare. For parts that have to fit, use your slicer's elephant foot compensation. Prusa's documentation says values around 0.2 mm usually work well for the default 0.4 mm nozzle. No purchase is needed to fix it.
Quick checks
| Symptom | First check | Typical first change |
|---|---|---|
| Smeared first layer, flattened brim or skirt | Z offset and first-layer squish (Prusa, QIDI) | Raise the nozzle in very small steps |
| Flare even though the first layer looks right | Bed temperature against the filament maker's range | Bring the bed back into range; Polymaker says no hotter than 60 °C for PLA |
| Worse on large, heavy or wide parts | The part's weight on a soft base (Bambu Lab) | Turn on the slicer's elephant foot compensation |
| Holes and slots near the bed come out too small | Whether compensation is off or at 0 | Around 0.2 mm on a 0.4 mm nozzle (Prusa), or measure a test cube as Bambu Lab describes |
| Lip shrinks once the fan speeds up | First-layer flow, line width and cooling (QIDI) | Change the profile's first-layer values one at a time |
| Flare keeps coming back on your own designs | The base edge of the model | A 0.2–0.5 mm chamfer around the base (QIDI) |
This guide is for anyone whose parts won't slide into a slot, whose boxes don't sit flush, or who just sees a ridge around the base of every print. It explains what causes the flare, the order to check things in, and why fixing it can work against first-layer adhesion.
What does elephant's foot look like?
Bambu Lab describes it as a "first-layer flare": the bottom of the model "(usually layer 1, and sometimes the first few layers) is wider than the layers above it, forming a protruding rim that looks like an elephant's foot." Polymaker describes the bottom few layers as "much thicker than the rest of your print," and notes that the flare tends to correct itself after about 5 to 10 layers. The bottom section is still the wrong size.
Things to look for:
- A lip or ridge around the base that you can feel with a fingernail.
- Holes and slots near the bed that come out too small, while the same features higher up are fine.
- A first layer that looks smeared, with lines merged together and a brim or skirt that looks flattened.
- A flare that is worse on large, heavy, or wide parts than on small ones.
On most decorative parts, a slight flare doesn't matter. Prusa says that "for many applications, this might not be an issue," and Bambu Lab says a slight elephant foot "can be ignored" on appearance parts. It matters when the bottom of the part has to fit something. Bambu Lab lists assemblies, snaps, rails, and shaft holes as tolerance-critical cases.
Why does elephant's foot happen?
Several causes can act at once. None is certain from one print, so use them to decide what to check first.
The nozzle is too close on the first layer
Prusa explains that the first layer "is squished against the heated print bed and as a result, it's usually a bit wider than it should be." Some squish is intended. Too much is a common cause, and the first thing to check. Polymaker puts it plainly: when the nozzle is too close, material "is built up, smashed out, and presents itself as thicker than the dimensions of the actual part." QIDI's guide lists a Z offset that is too low, or an uneven bed, as a first-layer cause, with smeared lines and an overly flattened skirt and brim as clues.
The bed is too hot for the material
A bed held near or above the plastic's softening point keeps the bottom layers soft while the rest of the part builds on top of them. Polymaker gives running the build plate too hot for the material as another cause, and says that "while it is easier to get good bed adhesion at these high bed temperatures, the deformation causes this elephant foot." The OrcaSlicer wiki also lists "bed temperature being too high" among the causes.
The weight of the part
Bambu Lab describes two effects acting together: the first layer is still soft from the bed's heat, and "later layers keep pressing down on a base that has not fully set." It adds that "larger models and wider bases usually show a more noticeable elephant foot." OrcaSlicer lists the weight of the material above as a cause too, along with thermal expansion of the material.
First-layer flow, line width, and cooling
QIDI's guide lists first-layer flow that is too high, a line width that is too wide, or cooling that is too low as slicer-side causes. A clue it gives: the lip shrinks once the fan speeds up later in the print. Check what your profile sets for the first layer before changing anything, and change one value at a time.
Step 1: Start from your printer maker's profile
Use the slicer profile your printer maker provides for your exact printer, nozzle size, build plate, and material. Some makers already build compensation into their profiles. Prusa says its official profiles have the setting "turned on by default," and Bambu Lab says its system default is fine for general models. If you've been editing first-layer settings, go back to the stock profile and print a simple test part, such as a cube, as your baseline.
Step 2: Check the first layer and Z offset
Over-squish is a common cause and costs nothing to check.
- Look at a single-layer test patch or the first layer of your baseline print. Lines should be slightly flattened and touching, not smeared into a smooth, shiny sheet with ridges.
- Raise the nozzle in small steps if the layer looks over-squished. QIDI suggests raising Z "in very small steps until the texture becomes even and the brim does not mushroom outward."
- Use your printer's own method. Prusa notes that its load-cell printers (CORE One, MK4/S, MK3.9/S, and XL) calibrate the first layer automatically, and that you can fine-tune it in PrusaSlicer under Printers, General, Z offset, "where a negative value means a more squished first layer." Other printers set Z offset in the printer menu, the slicer, or both. Check your manual.
Prusa also warns about the opposite mistake: if the nozzle is too high, "the filament won't stick properly." Make one small change, reprint, and compare. Our first-layer adhesion guide covers Z offset calibration in more detail.
Step 3: Check bed temperature against the filament maker's range
Look up the bed temperature your filament maker or printer maker recommends for the exact material and plate. Examples from manufacturers:
- PLA. Prusa's PLA guide recommends a 60 °C bed. Polymaker says you "should not print PLA with a build plate hotter than 60 degrees Celsius (sometimes only 50 degrees)." Bambu Lab's material table lists 35–45 °C on its Cool Plate and 45–65 °C on its other plates.
- PETG. Prusa recommends 85 °C for the first layer and 90 °C for the rest. Bambu Lab lists 60–80 °C for PETG on the plates it supports (it does not recommend its Cool Plate for PETG).
These numbers vary by brand, blend, and plate, so don't borrow one from a different product. If your bed is above the range on the spool or data sheet, bring it back into range first. Polymaker says that if Z height is right, you're within the suggested range, and you still see a flare, you can try reducing the bed temperature "a bit further." Do that in small steps and watch adhesion, because a cooler bed holds the part less firmly.
QIDI's guide suggests another option: keep the bed warm for the first layer, then step it down a few degrees once adhesion is established. Treat that as a test, not a default.
Step 4: Use the slicer's elephant foot compensation
Once the first layer and bed temperature are right, slicer compensation handles the small, predictable flare that's left. It shrinks the outline of the first layer (or first few layers) so the flare brings it back to size. It doesn't fix an over-squished first layer, so do Steps 2 and 3 first.
| Slicer | Setting | What the documentation says |
|---|---|---|
| PrusaSlicer | Print Settings, Advanced, Elephant foot compensation (Advanced or Expert mode) | Shrinks the first layer. "Values around 0.2 mm usually work well for the default 0.4 mm nozzle." Since PrusaSlicer 2.2, it detects thin lines in the first layer so it doesn't over-shrink them. |
| Bambu Studio | Process, Quality, Precision, Elephant foot compensation | Shrinks the first-layer contour. Bambu Lab says the default is fine for general models and gives a measurement method for high-accuracy parts. |
| OrcaSlicer | Quality, Precision, Elephant foot compensation and Elephant foot compensation layers | Applies a distance to the first set number of layers. The first layer gets the full value, and the amount tapers off linearly over the layers you set. |
| Cura | Initial Layer Horizontal Expansion | "A negative value can compensate for squishing of the first layer known as 'elephant's foot'." By default it takes the general Horizontal Expansion value, which is 0. |
Measure rather than guess
For parts that must fit, Bambu Lab describes a measurement method:
- Clean the plate and run the printer's bed leveling and flow calibration.
- Set elephant foot compensation to 0 and turn the brim off.
- Print a test cube. Bambu Lab suggests 25 × 25 × 10 mm. Let the bed cool fully before removing it, because forcing it off while hot can deform the part.
- With a caliper, measure the middle of each side (not the corners) at the top of the cube and at the very bottom edge. Press lightly, because too much pressure can deform the first layer and give a reading that's too small.
- Use the difference to calculate a compensation value, following the formula in Bambu Lab's guide.
Bambu Lab also notes that the right value "can vary between different types of build plates," so re-measure after changing plates. The same logic applies to other slicers. Make one change, reprint the same test, and compare.
Step 5: Design around it
For parts you design yourself, the model can absorb the flare:
- Add a small chamfer to the bottom edge. QIDI suggests "a 0.2–0.5 mm chamfer around the model's base" for parts that need to fit, so the leftover flare fills the chamfer instead of sticking out.
- Prefer a chamfer over a fillet at the bed. Prusa's design guide notes that a fillet facing the print bed creates "a very steep overhang," and recommends a chamfer instead if surface finish matters. It also says a chamfer on edges that slot together makes assembly easier.
- Consider a raft if the flare keeps coming back. Polymaker says a raft acts as a barrier between the part and the bed and should make the problem disappear. It also says it rarely uses a raft on its standard DIY machines, but uses one when elephant foot becomes a consistent issue. A raft adds material and cleanup, so try the other fixes first.
Does fixing it hurt first-layer adhesion?
Many fixes for elephant's foot work against adhesion, and many fixes for adhesion make the flare worse:
- More squish holds better. Prusa says PETG and other higher-temperature materials need to be "squished in the surface slightly more as they tend to warp" compared with PLA. That extra squish widens the first layer.
- A hotter bed holds better. Polymaker says it is easier to get good adhesion at high bed temperatures, which is also what deforms the base.
- A dirty plate invites over-squish. QIDI warns that dirt and high spots "tempt you to push the Z-offset lower than it should be. The print sticks, yet the base spreads." Clean the plate the way its maker specifies before lowering the nozzle. Our guide to textured vs smooth build surfaces covers how plates differ in adhesion and release.
Fix adhesion first. A part that comes loose mid-print is a bigger problem than a lip you can compensate for. Once the first layer sticks reliably at a normal squish and an in-range bed temperature, use slicer compensation for the remaining flare instead of backing off the settings that keep the part down.
A sensible test order
- Reset to your printer maker's profile for your exact printer, nozzle, plate, and material.
- Print a simple test cube as a baseline and measure the flare.
- Check the first layer and adjust Z offset in small steps.
- Bring bed temperature into the filament maker's range.
- Measure again, then set or tune slicer compensation.
- For your own designs, add a small base chamfer.
Change one thing per print and write down the result.
When not to buy parts
Elephant's foot is almost always a settings issue. You don't need a new build plate, nozzle, or printer to fix it. Hold off on buying anything if:
- You haven't checked Z offset or the first layer against your printer maker's calibration guide.
- Your bed temperature is above the range for the material.
- Your slicer's elephant foot compensation is off or at 0.
- The flare is small and the part doesn't need to fit anything.
A digital caliper is the one tool that helps, because it turns "looks wider" into a number you can compensate for. If you don't own one, our 3D printing tools shortlist covers measuring tools. If a plate turns out to be damaged or uneven after you've followed your printer maker's checks, match any replacement to your exact printer model. If the base is also lifting, see our warping guide, and for material differences in bed temperature and squish, see PLA vs PETG.
Sources
- Elephant foot compensation, Prusa Research
- Live adjust Z, Prusa Research
- PLA material guide, Prusa Research
- PETG material guide, Prusa Research
- Modeling with 3D printing in mind, Prusa Research
- Elephant foot (Bambu Studio parameter), Bambu Lab
- Filament guide: printer, nozzle, AMS, build plate, glue compatibility and required parameters, Bambu Lab
- Precision (print settings), OrcaSlicer project wiki
- Cura printer setting definitions (fdmprinter.def.json), UltiMaker Cura project
- Elephant Foot (Smooshed First Layer), Polymaker
- 3D Printing Elephant Foot: How to Fix and Prevent It, QIDI Tech
This page is research-based: we have not tested the products or methods ourselves. It draws on the manufacturer documentation and sources listed. Exact settings and fit always defer to your printer and filament makers.
Keep reading

First-layer adhesion: surface, calibration, and material checks
Diagnose first layers that won't stick, lift at the corners, or look over-squished: clean the surface, check Z offset, then the material.
Warping and lifted corners: diagnose before you buy anything
Why corners lift and tall parts split, and how to check material, surface, drafts, cooling, and brims one at a time before buying an enclosure or plate.
Textured vs Smooth Build Surfaces: Compatibility and Release Considerations
How smooth and textured PEI differ in finish, adhesion, release, and cleaning, and why plate fit depends on your exact printer model.