First-layer adhesion: surface, calibration, and material checks
Diagnose first layers that won't stick, lift at the corners, or look over-squished: clean the surface, check Z offset, then the material.
On this page (12 sections)
Most first-layer adhesion problems come from a print surface carrying oils or residue, or a nozzle that sits too high or too low. So clean the surface the way its maker recommends and run your printer's first-layer calibration first. The third common cause is a material and bed temperature that don't suit the surface. Confirm the sheet is seated with nothing underneath, and use the maker's profile for your exact material. For new materials that don't adhere well, Prusa suggests trying a heatbed temperature 5–10 °C higher. Treat that as a starting point from Prusa's guide, not a rule, and stay within what your filament maker and printer maker allow. Change one thing per test. A worn plate is a real cause, but usually the last one to confirm.
Quick checks
| Symptom | First check | Typical first change |
|---|---|---|
| Lines drag around or curl up instead of sticking | Oils or residue on the surface | Clean it the way the plate's maker recommends |
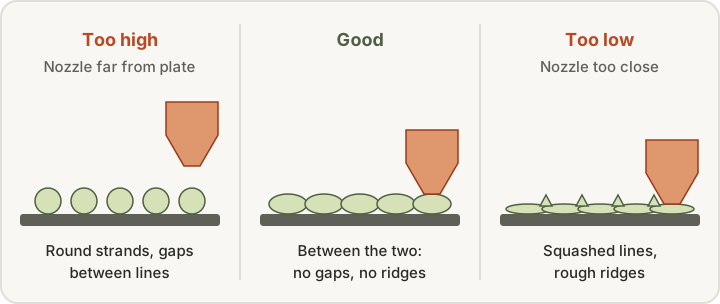
| Round lines with gaps between them | Nozzle height (Z offset) | Bring the nozzle closer in small steps, one test patch each |
| Rough, ridged or plowed first layer | Nozzle height (Z offset) | Raise the nozzle in small steps |
| One area behaves differently from the rest | Debris under the sheet, then leveling | Reseat the sheet and rerun leveling or the mesh |
| A new material won't stick | Material profile and bed temperature | Heatbed 5–10 °C higher (Prusa), within maker limits |
| Still loose after the checks above | First-layer speed | First three layers at about 75% speed (Prusa) |
| Corners lift partway through the print | Drafts and part cooling | Fan off for the first layer, then add a brim |
This guide is for anyone whose first layer won't stick, peels at the corners, or looks rough, squashed, or gappy. It walks through what each symptom tends to suggest, safe checks in a sensible order, and when a new build plate is actually justified.
What do first-layer problems look like?
Look closely at the first layer before deciding what's wrong. Common patterns include:
- Lines don't stick at all. Filament drags around behind the nozzle or curls up instead of laying flat.
- Corners or edges lift. The print starts fine, then corners peel up during later layers. This is often called warping.
- Visible gaps between lines. You can see rounded, separate strands with daylight between them.
- Rough, ridged, or transparent-looking first layer. The surface looks scraped or plowed, sometimes with ridges between lines.
- A flared bottom edge ("elephant's foot"). The first few layers bulge outward past the walls above.
- Good adhesion in one area, poor in another. One corner or side behaves differently from the rest.
Each of these has more than one possible cause. Gaps between lines often point to a nozzle set too high, but under-extrusion can look similar. A rough, squished layer often points to a nozzle set too low, but other causes are possible. Use the symptom to decide what to check first, not as a diagnosis.
Step 1: Clean the surface the way its maker recommends
Oils from fingers are one of the most common reasons a previously reliable plate stops working. Prusa's first-layer guide notes that if you don't touch the print surface with your hands or dirty tools, you don't need to clean it before every print. The inverse is the useful part: if you have handled it, clean it.
The right cleaner depends on the surface, and manufacturers don't all agree:
- Prusa smooth PEI sheets. Prusa's smooth sheet article recommends "~90% IPA (isopropyl alcohol) or denatured alcohol when cold" on unscented paper towels, and allows acetone occasionally for a deeper clean. Its first-layer guide also suggests warm water and dish soap for residue that alcohol doesn't remove, without fully submerging the sheet.
- Prusa textured and satin sheets. Prusa's first-layer guide says acetone should never be used on these sheets.
- UltiMaker 2+ glass plates. UltiMaker's cleaning instructions for that printer use "lukewarm water and a non-abrasive sponge," with detergent if needed for adhesives and alcohol gel for fatty substances, and say to let the plate cool and dry fully before reinstalling it.
Step 2: Check plate seating and debris underneath
On printers with a removable magnetic sheet, a small blob of plastic or a crumb under the sheet creates a local high spot. Prusa's steel sheet guide says to make sure the heatbed is "clean and free of any filament debris" before placing the sheet.
Signs that seating may be the issue include a single area that's always too squished or always too thin, and a problem that moved after you removed and replaced the plate. Check that the sheet sits flat and aligned with whatever locating pins or edges your printer uses.
Step 3: Calibrate nozzle height (Z offset)
The distance between the nozzle and the surface on the first layer has a large effect on adhesion. Prusa's Live adjust Z article explains the trade-off: too high and "the filament won't stick properly"; too low and it can't flow out, which can lead to a clog. Simplify3D's guide makes the same point about nozzles that sit too far from the bed. If nothing comes out of the nozzle at all on the first layer, see our no extrusion at print start guide.
How you set it depends entirely on your printer:
- Printers with a manual first-layer calibration or live Z adjustment. Use the maker's procedure. Prusa's printers without a load cell, for example, use a first-layer calibration routine and the Live adjust Z menu.
- Printers with automatic first-layer calibration. Prusa notes that its load-cell-equipped printers, such as the CORE One, MK4/S, MK3.9/S, and XL, calibrate the first layer automatically, and suggests adjusting a material-specific Z offset in PrusaSlicer rather than permanently altering the printer's calibration.
- Other printers. Check your manual for whether Z offset is set in the printer, the slicer, or both.
Make small adjustments and print a single-layer test patch each time. Don't copy someone else's Z offset value; it depends on the probe, nozzle, and sheet.
Step 4: Check bed leveling or mesh
If one side or corner behaves differently from the rest, leveling is a likely suspect. Simplify3D notes that on an unlevel bed one side may be too close to the nozzle while the other side is too far away.
Many printers now probe the bed and build a mesh before each print. If yours does, make sure it's enabled in the start routine your maker provides, and that the probe and nozzle are clean if the manual says so. If your printer uses manual leveling, follow the manufacturer's procedure. Don't adjust leveling hardware the manual doesn't tell you to touch.
Step 5: Use the right material profile and bed temperature
A profile meant for another material can undermine adhesion, even if everything else is correct. Use your printer maker's profile for your exact material type, and check the filament's own recommended bed temperature.
For new materials that don't adhere well, Prusa's first-layer guide suggests trying a heatbed temperature 5–10 °C higher. Simplify3D's guide gives broad bed ranges for PLA and ABS (our PLA printing problems guide covers other PLA-specific fixes). Both are general starting points from those sources; the right temperature varies by exact filament and surface, so stay within what your filament maker and printer maker allow.
Speed also matters. Simplify3D notes that a first layer printed too fast may not have time to bond, and Prusa suggests slowing the first three layers to about 75% speed if problems persist. Both are tips from those guides, not universal settings.
Step 6: Match the material to the surface
Some combinations stick too little; others stick too well.
- PETG on smooth PEI. Prusa's PETG guide says "do not print on the smooth PEI sheet" because adhesion becomes excessive, and suggests a glue stick as a barrier if you must. Prusa's smooth sheet article lists PETG, ASA, ABS, and PC Blend among materials that may need a separation layer, such as glue stick or window cleaner. Our PETG printing problems guide covers PETG-specific fixes.
- TPU and flexibles. Prusa's steel sheet guide warns that TPU and PETG "will adhere too much and can damage the sheet when removed" on its smooth sheet.
- Glass plates. UltiMaker's cleaning guide for the UltiMaker 2+ recommends a thin layer of glue on the glass plate for most materials.
The takeaway is not that glue is universally good or bad. It's that the right preparation depends on the specific surface and material, so check your printer and filament makers' guidance. Avoid improvising with solvents or adhesives your surface's maker doesn't mention. Our textured vs smooth build surfaces guide explains the differences, and the PLA vs PETG guide and TPU compatibility guide cover material-specific quirks.
Step 7: Reduce drafts and early cooling
Corners that lift partway through a print often have more to do with shrinkage than with the first layer itself. Simplify3D explains that plastic shrinks as it cools, and that this pulls corners up.
Things to look at:
- Part cooling on the first layers. Simplify3D suggests starting the first layer with the fan off and bringing it up over the next few layers. Prusa's PETG guide also suggests printing the first few layers with the fan off. Beyond the first layers, follow your material profile's cooling settings.
- Drafts. Air conditioning, open windows, and fans pointed at the printer can cool one side faster than the other.
- Enclosures. Simplify3D notes that an enclosure can help regulate the temperature around the print, which matters most for materials such as ABS. See the Enclosures: what to check before you buy ↗ for considerations. An enclosure is not a ventilation solution, so keep your printer maker's ventilation guidance in mind.
Step 8: Add a brim when the geometry needs it
A brim adds extra lines around the base of the part to increase contact area. Prusa and Simplify3D both list it as a way to help adhesion, and Simplify3D notes that brims and rafts help hold edges down on warp-prone prints. Brims are especially useful for small contact areas, sharp corners, and tall, narrow parts. They cost a little trimming, but no hardware.
When is a worn plate actually the cause?
Build surfaces do wear. Prusa's smooth sheet article says that over 1–2 years of use, the PEI surface may become smoother and lose adhesion, and describes light sanding with fine-grit paper as a way to refresh that specific sheet. Its steel sheet guide also notes that scratches, dents, and cracks are cosmetic damage not covered by warranty, which tells you they're expected with use.
A worn plate is more plausible when:
- Adhesion has declined gradually over months, not suddenly.
- The problem is concentrated in the area where you print most often.
- The surface is visibly scratched, shiny, gouged, or peeling.
- A careful clean, recalibration, and correct profile haven't helped.
Sanding or other restoration is specific to a surface type and maker. Only do it if your plate's manufacturer documents it.
When should you hold off on buying parts?
A new plate, probe, or adhesive is rarely the first fix. Hold off if:
- You haven't cleaned the plate with the method its maker recommends.
- The problem appeared right after handling the plate, changing material, or changing profiles.
- You haven't run your printer's first-layer or Z-offset calibration since the issue started.
- Only one area is affected and you haven't checked for debris under the sheet.
If a surface is genuinely worn or damaged, or you're printing a material your current surface handles poorly, then a replacement or second surface can make sense. Check our Build plates: what to check before you buy ↗ and confirm compatibility for your exact printer model and revision with the manufacturer before buying.
If adhesion is fine but you're seeing hairs between parts, our stringing troubleshooting guide covers that separately.
Sources
- First layer issues, Prusa Research
- Live adjust Z, Prusa Research
- Smooth steel sheet, Prusa Research
- Flexible steel sheets, Prusa Research
- PETG material guide, Prusa Research
- UltiMaker 2+ - Clean the printer, UltiMaker
- Print not sticking to the bed (Print Quality Guide), Simplify3D
- Warping (Print Quality Guide), Simplify3D
This page is research-based: we have not tested the products or methods ourselves. It draws on the manufacturer documentation and sources listed. Exact settings and fit always defer to your printer and filament makers.
Keep reading

Textured vs Smooth Build Surfaces: Compatibility and Release Considerations
How smooth and textured PEI differ in finish, adhesion, release, and cleaning, and why plate fit depends on your exact printer model.

PLA vs PETG: Choosing for the Actual Project
How to choose between PLA and PETG by what the part has to do: heat, stiffness, toughness, print ease, stringing, and build-plate release.
TPU Compatibility: Extruder Path, Hardness, and Feeding Systems
Whether a TPU will feed in your printer depends on its Shore hardness, your extruder path, and whether it goes through an automatic material system.