Layer shifting troubleshooting: collisions, belts, pulleys, and speed
Why layers slide sideways mid-print: check for collisions and snags, belt tension, loose pulleys, and speed before calling support or buying parts.

On this page (10 sections)
A layer shift happens when the print head or bed loses its position partway through a print, so every layer after that point prints offset from the ones below. Check for collisions and snags first: the nozzle hitting the print (often a curled or warped edge), or a spool, cable or tube catching the moving parts. Polymaker says a single shift most often comes from an obstruction. Then check belts and pulleys using your printer maker's procedure. Prusa says a loose or misaligned pulley is a main cause of staircase-style shifts, and for the MK3/S/+ it gives best belt status values of around 250 on the X-axis and 275 on the Y-axis. Then check speed, because speeds and accelerations higher than the printer can handle make the motors skip. Most layer shifts don't need new parts. If shifts continue after those checks, contact the printer maker's support.
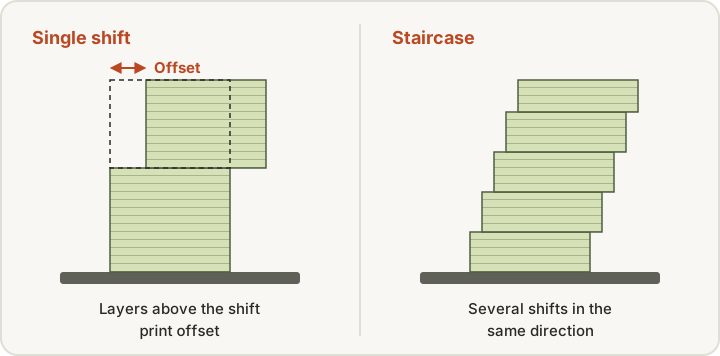
This guide is for anyone whose prints have a sudden step, or a staircase of steps, partway up. It explains what the pattern of the shift can tell you, lists the competing causes, and links the belt checks that Prusa, Bambu Lab, and Creality document for specific models.
What does layer shifting look like?
Prusa describes layer shifting as layers that "shift from their intended positions," usually from abnormal movement on the X or Y axis. Creality describes the typical look: the model suddenly shifts at a certain height and "all subsequent layers continue printing from the new offset position." You might see:
- A single step where the top part of the print is offset from the bottom.
- A staircase of several small shifts in the same direction.
- Shifts in one axis only, such as front-to-back on a bed-slinger.
- A shift at the same height every time you print the same file.
Simplify3D explains why the printer carries on regardless: most printers have no feedback about the toolhead's actual position, so if the toolhead is knocked to a new position, "the machine has no feedback to detect this, so it would just keep printing."
The pattern helps narrow it down. Polymaker separates single shifts, which it says are most often caused by an obstruction, from multiple shifts, which point toward belts, rods or bearings, speed, motors, or pulleys. Prusa says a loose or misaligned pulley is a main cause of staircase-style shifts. Neither rule is certain, so check one cause at a time.
Cause 1: The nozzle hit the print
If the nozzle catches a raised edge, the force can push the head off course.
- Curling and warping. Bambu Lab says that if a model warps, "the nozzle may strike the warped section, leading to step loss or displacement of the model." Prusa notes that overhangs and low infill raise the risk of collisions and suggests more part cooling or longer retraction, or splitting the object. Our warping guide and first-layer adhesion guide cover the root causes.
- Sticky filament on the nozzle. Bambu Lab says high-viscosity filament such as PETG can stick to the nozzle and drag across the model. It suggests drying the filament or enabling the prime tower. Our filament sticking to the nozzle guide covers that buildup. See our dryer vs dry box guide if moisture is likely.
- Very thick layers. Polymaker notes that with very large nozzles and layer heights, the nozzle can drag over infill during travel. It says this shouldn't matter at standard nozzle sizes and layer heights.
No purchase is needed for any of these. They're settings, adhesion, and filament-condition fixes.
Cause 2: Something snagged the moving parts
Anything that pushes harder than the motor can resist will cause a skip. Polymaker says a single shift most often comes from "an obstruction during the printing process," such as a tangled spool or a cord in the way.
What the makers say to check:
- Prusa: filament stuck around a belt, "usually around the Y-axis pulley," and zip ties or parts of the extruder cable bundle that touch the frame. On the MINI, Prusa says to make sure the cable bundle doesn't limit X-axis travel.
- Bambu Lab: filament piled up in the purge chute, a damaged toolhead cable chain on the X1, P1, P2, and H2 series, and poorly routed tubes or cables on the A series. It suggests watching the axes move to spot anything in the way.
- Creality (SPARKX i7): the printer's placement and the routing of cables and PTFE tubes. Move the bed forward and back and the toolhead left and right to confirm there's clearance, nothing snags the PTFE tube or toolhead cable, and no debris sits under the bed.
Also check that the printer has clearance from walls and other objects at the full extent of its travel.
Cause 3: Belt tension
Simplify3D says belts can stretch over time, and "if the tension becomes too loose, the belt may slip on top of the drive pulley." Polymaker notes that belts can also be too tight, which causes binding. Prusa lists wrong belt tension as one of the two most common causes.
Belt procedures differ a lot between printers. Some use a spring tensioner that sets itself, and some printers measure tension for you. Use your maker's procedure for your exact model. Don't tighten by feel past what the maker specifies.
Prusa
Prusa's layer-shifting article has separate sections for the CORE One, the MK-series, the MINI/MINI+, and the XL, and links a dedicated belt tension guide for several of them. For the MK3/S/+, Prusa says the printer has a Belt status menu, and that the best approximate values are "around 250 on the X-axis, and 275 on the Y-axis, with an optimal range at +-15 from these values." Those numbers apply only to that printer family.
Bambu Lab: X1 and P1 series
Bambu Lab says the X1 monitors belt tension through a frequency sweep during calibration, and that when the measured frequency changes, it's time to retension. The procedure starts with the printer powered off. You loosen the four tensioner screws without removing them, move the toolhead back and forth, park it at the rear, and retighten. A spring in the tensioner sets the tension. Bambu warns, "DO NOT overtighten the belt tensioning screws," and says to recalibrate afterward, because belt work changes how the toolhead behaves. It suggests cleaning the carbon rods at the same time.
Bambu Lab: A1
Bambu Lab says the A1 runs a frequency sweep during print preparation and shows a prompt if a belt needs retensioning. The page gives separate steps for the X, Y, and Z belts using an H2.0 Allen key: loosen the tensioning screws by one turn (not fully), move the axis by hand (back and forth three times for X and Y; for Z, home the printer and move the axis up and down once), and retighten. It then says to run Vibration Compensation from the calibration menu. Other Bambu Lab models have their own belt pages, so use the one for your printer.
Creality
Creality's SPARKX i7 guide says loose belts "may slip and cause layer shifting" and links a manual tensioning guide for that printer. It covers the X, Y, and Z belts with the included hex wrenches: loosen two screws by one turn, move the axis three times, retighten, then run vibration compensation from the printer's calibration menu.
For the Ender-3 V3 SE, Creality's X-axis stuttering page lists a belt that's too loose and pulley problems among the causes. Its first step is to power off, unplug the motor wire, and move the axis by hand to feel for jamming. Other Creality models have their own wiki pages, and we haven't reviewed them here.
Cause 4: Loose pulleys and grub screws
Each axis motor drives its belt through a small toothed pulley held on the motor shaft by grub (set) screws. Simplify3D explains that if a set screw loosens, "the motor may be spinning, but the pulley and belts are not moving."
Prusa's instruction is specific: "Both grub screws need to be tight, one of them has to be tightened against the flat part of the motor shaft." Its article also gives pulley positions for the CORE One and XL motors. Polymaker adds that worn pulley teeth can cause shifts, and that any replacement pulley must have the correct number of teeth.
Check pulleys with the printer off and unplugged, using your maker's instructions to reach them. On some printers, such as the Prusa MINI, the maker's guide explains how to rotate the motor from the menu to expose a screw.
Cause 5: Speed and acceleration
Simplify3D says that if you move the printer "faster than the motors can handle, you will typically hear a clicking sound as the motor fails to achieve the desired position." Polymaker explains it in terms of torque: if a move needs more force than the motor can supply at that speed and acceleration, the motor skips.
- Use the maker's speed limits. Creality gives the SPARKX i7's limits as 500 mm/s and 10,000 mm/s² acceleration, and says exceeding them may cause skipped steps. Your printer's limits will differ.
- Don't jump speed modes mid-print without reason. Bambu Lab gives the example of switching from Normal to Ludicrous on screen during a print as a way to cause a shift.
- Slow down for large prints. Prusa recommends decreasing speed for large objects on the MINI.
- Use the printer's own protections. Bambu Lab describes an "Auto-recovery from step loss" option that, when a lost step is detected, repositions the axes to where they were before the shift and continues the print. It's on the printer screen for the X1, A, H2, P2S, and X2D series, and in Bambu Studio for the P1 series. Prusa recommends normal mode rather than stealth mode for bigger or more complex prints, and notes that on its MK-series printers crash detection isn't available in stealth mode.
- Keep the motion system clean. Bambu Lab notes that resistance in dirty carbon rods can add to the problem on the X1 and P1, and Prusa recommends cleaning and lubricating the smooth rods on its MK-series printers.
Cause 6: Motor or driver overheating
Simplify3D says motor driver electronics can overheat, "which causes the motors to stop spinning temporarily until the electronics cool down." Polymaker lists a malfunctioning or overheating stepper or driver as a cause, along with damaged motor wiring that loses contact during certain movements.
There's not much to check safely at home here beyond making sure the printer's vents and fans aren't blocked and the room isn't unusually hot. Don't open the electronics enclosure or change motor current unless your maker's documentation tells you to. If you suspect a motor, driver, or wiring fault, that's a support case.
A sensible test order
- Look at the failed print. Note the height, the axis, and whether there's one shift or several.
- Check for curling, warping, or blobs where the nozzle could have hit.
- With the printer off, move each axis by hand through its full travel. Feel for rough spots or snags, and check cables, tubes, and the spool.
- Return to the maker's speed profile and avoid changing speed mode mid-print.
- Check belt tension using your maker's procedure, then run any recalibration it calls for.
- Check that the motor pulleys are tight on their shafts.
- Reprint the same file. If it shifts at exactly the same height again, Polymaker suggests re-slicing and re-uploading the file in case it's corrupted.
Change one thing at a time and write down what happened.
When is it a hardware fault for support?
Contact your printer maker's support if:
- Shifts keep happening after you've cleared snags, set belts by the maker's procedure, checked pulleys, and returned to stock speeds.
- An axis feels rough, catches, or jams when moved by hand with the power off.
- The printer reports a motor, homing, or belt error, or a frequency sweep keeps asking for retensioning.
- You see damage to a belt, pulley, cable chain, or rod.
Bambu Lab's pages say to submit a technical ticket if its guide doesn't solve the problem, and its A1 page suggests including a picture or video. Creality's Ender-3 V3 SE page gives its after-sales address for problems that remain after the listed checks. For Prusa printers, work through the section of the layer-shifting article for your model first, then contact Prusa's support with what you've checked.
When should you hold off on buying parts?
Hold off on new belts, pulleys, or motors if:
- The shift lines up with a curled edge, a blob, or a tall thin part the nozzle could have knocked.
- You haven't checked for snags or set the belts with your maker's procedure yet.
- You recently raised speeds or acceleration above the maker's profile.
- Your printer is still under warranty. Ask the maker's support before replacing anything yourself.
Buy parts only when the maker's checks point to a worn or damaged part, and get the one specified for your exact printer model.
Sources
- Layer shifting, Prusa Research
- Layer Shift: Causes and Solutions, Bambu Lab
- X1/P1 Series Belt tensioning procedure, Bambu Lab
- A1 Belt Tensioning, Bambu Lab
- SPARKX i7 Layer Shifting Troubleshooting Guide, Creality (Creality Wiki)
- SPARKX i7 Manual Belt Tension Adjustment, Creality (Creality Wiki)
- X-axis Movement Stuttering (Ender-3 V3 SE), Creality (Creality Wiki)
- Layer shifting (Print Quality Guide), Simplify3D
- Layer shifts (Common printing issues), Polymaker
This page is research-based: we have not tested the products or methods ourselves. It draws on the manufacturer documentation and sources listed. Exact settings and fit always defer to your printer and filament makers.
Keep reading

Warping and lifted corners: diagnose before you buy anything
Why corners lift and tall parts split, and how to check material, surface, drafts, cooling, and brims one at a time before buying an enclosure or plate.
First-layer adhesion: surface, calibration, and material checks
Diagnose first layers that won't stick, lift at the corners, or look over-squished: clean the surface, check Z offset, then the material.

Stringing troubleshooting: moisture, temperature, and motion settings
How to diagnose stringing and oozing one change at a time: check filament moisture, nozzle temperature, retraction, and travel settings before buying parts.