Blobs and zits on the surface: seams, retraction, and pressure
Why small bumps form where each loop starts and stops, and how seam placement, retraction, wipe, coasting, and pressure advance settings reduce them.
On this page (10 sections)
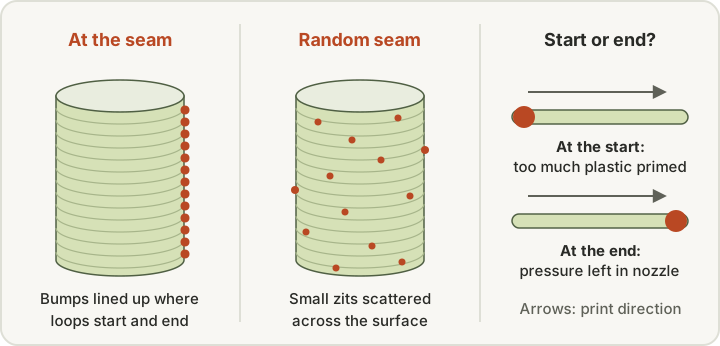
Blobs and zits are small bumps where the nozzle starts or stops a loop of plastic. Some seam is normal: Prusa says you can't eliminate it with FDM printing, only make it less visible. To reduce it, first choose where the seam goes (aligned, rear, or hidden in a corner). Then tune how extrusion starts and stops. For a bump at the start of a loop, Simplify3D suggests a negative extra restart distance. For a bump where the loop ends, it suggests coasting, and says 0.2–0.5 mm is typically enough to make a noticeable difference. Retraction and wipe help too. Calibrate pressure advance (called linear advance on some printers) for each filament, and rule out wet filament and pauses that leave the nozzle sitting still. Start from your printer maker's profile and change one setting per test print.
Quick checks
| Symptom | First check | Typical first change |
|---|---|---|
| Bumps in a vertical line on the outer wall | Seam position | Move the seam: aligned, rear or back, a sharp corner, or painted |
| Bump only at the start of a loop | Too much plastic primed on restart (Simplify3D) | A negative extra restart distance, such as Simplify3D's −0.2 mm example |
| Bump only where a loop ends | Pressure left in the nozzle (Simplify3D) | Coasting of 0.2–0.5 mm (Simplify3D), or wipe |
| Blobby sharp corners | Pressure advance or linear advance (Prusa, Bambu Lab) | Calibrate it for that filament |
| Scattered blobs with popping sounds | Wet filament (Polymaker) | Try a fresh or dried spool |
| Blobs at every layer change | Minimum layer time pauses or power-loss recovery (Polymaker) | Polymaker suggests a 3-second minimum layer time for most materials, as long as layers don't curl |
This guide is for anyone seeing small bumps, pimples, or a lumpy vertical line on the outside of otherwise clean prints. It explains where blobs come from and how they differ from stringing. It then covers the seam, retraction, and pressure settings that Prusa, Bambu Lab, OrcaSlicer, Cura, Simplify3D, and Polymaker document.
What are blobs and zits?
Simplify3D explains that the extruder "must constantly stop and start extruding" as it moves around a print, and that each stop and restart "can create extra variation." Where the outer wall starts and later closes, you may see "a small mark on the surface," which it says "are commonly referred to as blobs or zits." Prusa's seam article says the start and end point of each perimeter loop "creates a potentially visible vertical seam," and that it's "also commonly called zits, layer seams, or scars."
Prusa notes that the seam will be obvious on cylindrical objects "without any sharp corners." Bambu Lab says the same: seams can be hidden on surfaces with corners, but models with circular surfaces "will not be able to hide the seams."
Blobs or stringing?
Both come from plastic leaving the nozzle at the wrong moment, so they share some fixes. The difference is where the plastic ends up:
| What you see | Most likely |
|---|---|
| Bumps in a vertical line, or scattered bumps on the outer wall | Seam blobs from loop starts and ends |
| Bump only at the very start of a loop | Too much plastic primed on restart (Simplify3D) |
| Bump only where a loop ends | Pressure left in the nozzle as it stops (Simplify3D) |
| Bulging or blobby sharp corners | Pressure advance or linear advance needs calibrating (Prusa, Bambu Lab) |
| Hairs or webs between separate parts | Stringing during travel. See our stringing guide |
| Blobs scattered across the print, with popping sounds | Possibly wet filament (Polymaker) |
Step 1: Watch where the defect forms
Simplify3D's first suggestion is to watch closely as each outer wall prints. Does the defect appear "the moment the extruder starts printing the perimeter," or "only later when the perimeter is completed"? A bump at the start points to retraction and priming. A bump at the end points to pressure that's still in the nozzle. Knowing which one you have saves a lot of guessing.
Step 2: Choose where the seam goes
Seam placement doesn't remove the blob, but it decides where it shows. The slicers name the options slightly differently.
- PrusaSlicer: Nearest, Aligned, Random, and Rear, under Print settings > Layers and perimeters > Seam position. Prusa says Nearest prefers concave corners, so on models with sharp corners the seam becomes "effectively invisible." Aligned keeps the seam "mostly aligned throughout the whole object." Rear places it near the back of the bed, which helps "for objects that will be displayed with a specific orientation." Since PrusaSlicer 2.3, a seam painting tool lets you choose exactly where it goes.
- Bambu Studio: Nearest, Aligned, Back, and Random, plus seam painting. Bambu says Back is a good choice when you want a smooth front surface.
- OrcaSlicer: Its wiki says Aligned Back, Aligned, or Back "work the best, especially in combination with seam painting or Precise Seam modifiers." Aligned Back avoids the front while still looking for hidden spots.
- Cura: Z Seam Alignment offers User Specified, Shortest, Random, and Sharpest Corner, with Sharpest Corner as the default. A Seam Corner Preference setting controls whether seams favor inside or outside corners.
- Simplify3D: You can randomize start points or align them near a chosen XY location, for example "on the backside of the model."
What about random seams?
Random seams trade one visible line for many small bumps. Prusa says Random makes the seam less noticeable "at the cost of a less smooth surface (small zits scattered across the surface)," and that it makes little sense on models with sharp corners. Bambu says Random "will cause some 'zits' effects." Polymaker is blunter: with Random, "you will likely see ugly little blobs all over your print," and it suggests Sharpest Corner instead. Prusa and OrcaSlicer both note one upside: spreading the seam around can make a part stronger, because the seam is a weak point.
Scarf seams
A scarf seam ramps the start and end of a loop so they overlap instead of meeting at one point. PrusaSlicer, Bambu Studio, and OrcaSlicer all document it:
- Prusa says scarf seams hide visible seams "on smooth perimeters," but they increase print time and are "less effective in sharp corners and overhangs."
- Bambu says Bambu Studio introduced scarf seams in version 1.9 and that from version 1.10 you can enable them per filament. By default, its smart selection skips scarf seams where a sharp corner can already hide the seam.
- OrcaSlicer recommends printing scarf joints slowly, at less than 100 mm/s, and notes that they need tuning of length, speed, and flow.
Prusa also mentions Spiral vase mode, which avoids the seam completely, but limits you to "only one perimeter and no infill."
Step 3: Tune how extrusion starts and stops
Retraction and restart amount
Retraction pulls filament back before travel. OrcaSlicer's wiki says that if retraction is too short, "it may not effectively prevent oozing," and if it's too long, "it can lead to clogs or under-extrusion." Raise it in small steps from your printer maker's profile, not by large jumps.
If the bump appears at the start of a loop, Simplify3D says the extruder "is likely priming too much plastic." Its fix is a negative Extra Restart Distance. For example, with 1.0 mm of retraction and −0.2 mm extra restart, the printer retracts 1.0 mm but only pushes 0.8 mm back. Cura has a related setting, Retraction Extra Prime Amount, which it describes as compensation for material that oozes away during travel.
Coasting
If the bump appears where a loop ends, Simplify3D suggests coasting, which "will turn off your extruder a short distance before the end of the perimeter to relieve the pressure." It says a coasting distance of 0.2–0.5 mm is typically enough to make a noticeable difference. Cura describes coasting as replacing "the last part of an extrusion path with a travel path," and suggests a coasting volume "close to the nozzle diameter cubed."
Polymaker says coasting usually helps on inexpensive Bowden printers, especially with PETG. It also warns that coasting you don't need can leave holes in the side of the print. For PETG-specific blobs, including buildup on the nozzle, see our PETG printing problems guide.
Wipe
A wipe keeps the nozzle moving while it retracts, so leftover plastic isn't left in one spot.
- Prusa recommends leaving Wipe while retracting on in PrusaSlicer.
- OrcaSlicer says its wipe option moves the nozzle along the last path and "can minimize blobs when printing a new part after traveling." Its seam settings also include Wipe on loop, which moves the nozzle slightly inward at the end of a loop to reduce seam unevenness by "tucking in the end of the seam to the part."
- Simplify3D suggests enabling Wipe Nozzle with a wipe distance of 5 mm as a starting point, plus "Perform retraction during wipe movement," so the printer never retracts while standing still.
Seam gap
PrusaSlicer, Bambu Studio, and OrcaSlicer can stop a loop slightly short of where it started so there's room for the extra material. Bambu says its default is 15% of the nozzle diameter. OrcaSlicer says that on a well-tuned printer with pressure advance and retraction, "a value of 0-15% is typically optimal." Prusa says negative values make the ends overlap instead.
Step 4: Calibrate pressure advance or linear advance
Pressure builds in the nozzle while printing and doesn't vanish the instant the printer slows down. Bambu Lab says that when decelerating, "the residual pressure causes excess filament to ooze out, leading to blobs or stringing," and that "these issues worsen with faster print speeds." Firmware compensates by predicting that pressure. The feature has different names:
- Prusa MK3 and MK2 families: Linear Advance. Prusa says it reduces extrusion just before the printer stops, which "prevents blobs or artifacts at the sharp corners." Its tip for these printers: "If sharp corners have blobs, increase the K value. If you see missing filament, decrease the K value." Prusa's filament presets already include K values. For MK4-family, XL, and MINI/+ printers from firmware 5.0.0, Prusa says Linear Advance is replaced by Pressure Advance.
- Bambu Lab: Flow Dynamics, with a K value that is "specific to a printer and filament combo." Bambu says the H2D, X1, and A1 series support automatic calibration (the A1 series from firmware 01.04.00.00), while the P1 series supports only manual calibration. Bambu says to recalibrate when you use a new filament brand or model, when the nozzle is worn or replaced, or when you change maximum volumetric speed or print temperature.
- OrcaSlicer: Tower, pattern, and line tests, each with a direct-drive and a Bowden version. For the tower, it says to examine "each corner and seams" and mark the height that looks best. On Marlin printers, Linear Advance must be enabled in firmware, and on Bambu Lab printers it says not to select the "Flow calibration" option. Save the result in the filament profile.
Bambu adds a caveat: damp filament makes Flow Dynamics results "unsuitable for use with fresh filament." So dry the spool before you calibrate.
Prusa says the seam's visibility is affected by both Linear Advance and the extrusion multiplier, and that its stock profiles already have both tuned. If you're on a custom profile, it suggests lowering the extrusion multiplier and calibrating linear advance. Polymaker also lists over-extrusion as a cause of blobs.
Step 5: Check travel, z-hop, and pauses
- Fewer retractions. Simplify3D says it's sometimes better to avoid a retraction entirely, particularly on Bowden printers. Options like "Only retract when crossing open spaces" and "Avoid crossing outline for travel movement" keep ooze inside the part. Cura's combing does something similar, and it says combing "reduces the need for retractions."
- Faster travel. Polymaker says faster travel gives plastic less time to ooze, if your printer's motors and frame can handle the speed.
- Z-hop. Cura says Z Hop When Retracted creates clearance between the nozzle and the print on each retraction, which stops the nozzle "hitting the print during travel moves." Prusa says lower lift values improve stringing, but turning lift off "may cause the nozzle to hit the printed part." OrcaSlicer can lift in a spiral, which it says "can prevent stringing." Treat z-hop as a trade-off, and change it only after the settings above.
- Pauses that leave the nozzle sitting still. Polymaker says a minimum layer time set too high makes the head pause between layers, and these pauses "often result in oozing, leading to blobs and strings." It suggests 3 seconds for most materials, as long as layers don't curl. It also says power-loss recovery can cause brief pauses after each layer that leave blobs, though turning it off means you can't resume after a power cut.
Step 6: Could it be wet filament?
Moisture causes bumps that no seam setting will fix. Polymaker says absorbed moisture "turns into steam" in the hotend. If you hear "pops or sizzling while extruding, that's water vapor escaping." It names nylon, PVA, TPU, and PETG as highly hygroscopic. Prusa's drying guide says a high water content can cause "blobs on the prints, and bubbling and smoke during extrusion."
If the blobs are scattered randomly rather than lined up along the seam, try a freshly opened or dried spool before changing settings. Our dryer vs dry box comparison and filament storage guide cover keeping it dry.
A sensible order
- Reset to your printer maker's profile for your exact printer, nozzle, and filament.
- Watch a print and note whether bumps form at loop starts, loop ends, corners, or at random.
- Move the seam: aligned, rear or back, a sharp corner, or painted.
- Try a dry or fresh spool, especially if you hear popping.
- Calibrate pressure advance, linear advance, or Flow Dynamics for that filament.
- Adjust restart amount for start blobs and coasting or wipe for end blobs, one at a time.
- Check minimum layer time and power-loss recovery pauses.
- Consider scarf seams for smooth, curved surfaces.
When not to buy parts
Seam blobs are almost always a settings or filament problem. Before buying anything:
- Make sure it's not just the seam. Prusa says the seam "will always be somewhat visible." A faint line on the back of a cylinder may be as good as it gets.
- Check that the bumps follow the spool. If a fresh spool prints clean, a filament dryer may be worth more than any hardware.
- Recalibrate after a nozzle change. Bambu lists a replaced or worn nozzle among the reasons to rerun Flow Dynamics calibration.
If blobs come with gaps or thin lines, our under-extrusion guide may help. If plastic is collecting on the outside of the nozzle itself rather than oozing from the tip, see our guide to filament leaking around the nozzle.
Dryers & dry boxes: what to check before you buy ↗ PLA: what to check before you buy a spool ↗Sources
- Blobs and Zits (Print Quality Guide), Simplify3D
- Seam position, Prusa Research
- Linear Advance, Prusa Research
- Stringing and oozing, Prusa Research
- Drying filament, Prusa Research
- Seam, Bambu Lab
- Flow Dynamics Calibration, Bambu Lab
- Seam settings (quality_settings_seam), OrcaSlicer project wiki
- Pressure Advance calibration, OrcaSlicer project wiki
- Retraction (printer_extruder_retraction), OrcaSlicer project wiki
- Z-Hop (printer_extruder_z_hop), OrcaSlicer project wiki
- Cura printer setting definitions (fdmprinter.def.json), UltiMaker Cura project
- Blobs and Oozing, Polymaker
- Wet Filament, Polymaker
This page is research-based: we have not tested the products or methods ourselves. It draws on the manufacturer documentation and sources listed. Exact settings and fit always defer to your printer and filament makers.
Keep reading

Stringing troubleshooting: moisture, temperature, and motion settings
How to diagnose stringing and oozing one change at a time: check filament moisture, nozzle temperature, retraction, and travel settings before buying parts.

Under-extrusion troubleshooting: gaps, thin walls, and weak layers
Find why your printer lays down too little plastic: check filament, temperature, flow and speed settings, and the feed path before buying parts.

Filament dryer vs dry box: drying and storage explained
A dry box keeps dry filament dry; a dryer removes moisture that is already in it. How to tell which problem you have, and what to do safely.