Visible Z seam: hiding the line where each layer starts
Why a vertical line runs up the side of a print, and how seam position, scarf seams, seam gap, wipe and pressure advance make it less visible in each slicer.
On this page (9 sections)
A Z seam is the vertical line that forms where each layer's outer wall starts and ends. Bambu Lab calls it "unavoidable in FDM 3D printing," and Prusa says it "will always be somewhat visible," so the goal is to hide it, not remove it. First choose where it goes: aligned, at the back, in a sharp corner, or painted by hand. On smooth, round surfaces, try a scarf seam. Bambu Studio and OrcaSlicer have one, and we found it in the source of PrusaSlicer 2.9 and Cura 5.9 onward. Then make the seam cleaner with seam gap (Bambu Studio and PrusaSlicer 2.9.6 both default it to 15%), wipe settings, wall order and a calibrated pressure advance. OrcaSlicer says that if you get bulges at the seam, "the first thing to tune would be pressure advance." Change one setting per test print.
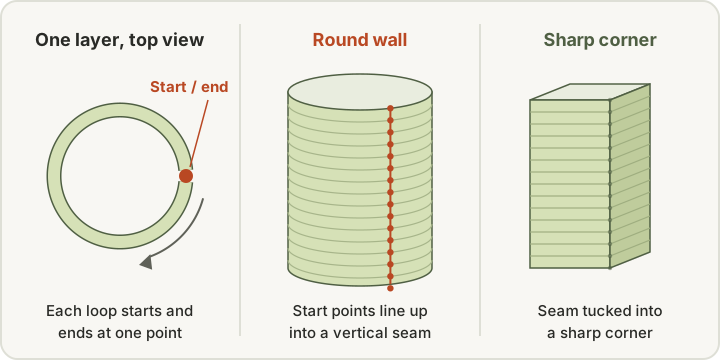
This guide is for anyone whose prints look fine except for a line or ridge running straight up one side. Prusa and Bambu Lab both say it's hardest to hide on cylinders and other round shapes. It covers what the seam is, the placement options each slicer offers, scarf seams, and the wipe, gap and pressure settings that makers say affect how the seam looks. If your problem is scattered bumps rather than a line, our blobs and zits guide goes deeper on retraction, coasting and restart settings.
What is the Z seam?
Unless you print in spiral vase mode, every loop of wall has to start and stop somewhere. Bambu Lab describes the seam as "a kind of gap between the start and end points of each perimeter of the layer" that "leaves vertical seams on the surface of the model." Prusa says the start and end point "creates a potentially visible vertical seam on the side of the object." OrcaSlicer's wiki puts it simply: "every layer needs to begin somewhere and end somewhere."
The shape of the model decides how easy it is to hide:
- Corners help. Bambu says seams "can be well hidden on irregular surfaces such as those with concave and convex vertices."
- Round shapes show it. Bambu says models with circular surfaces, such as cylinders, "will not be able to hide the seams, which will be very obvious." Prusa says the same about objects that are "cylindrical, without any sharp corners."
Seam line or something else?
| What you see | Most likely | Where to look |
|---|---|---|
| A neat vertical line or ridge on one side | Normal Z seam placement | This guide |
| A seam that wanders around the part | Nearest or Random placement | Step 1 below |
| A bulge at the seam | Extrusion not stopping cleanly at the end of the loop (OrcaSlicer) | Steps 3 and 5 below |
| A notch or gap at the seam | Pressure advance too high, or ooze during a long travel before the wall starts (OrcaSlicer) | Steps 5 and 6 below |
| Bumps scattered over the whole surface | Random seams, retraction or oozing | Our blobs and zits guide |
| Hairs between parts | Stringing during travel | Our stringing guide |
Step 1: Choose where the seam goes
Every major slicer lets you choose the seam position. The names differ, so here is how they line up.
| Slicer | Options | Default we found |
|---|---|---|
| Bambu Studio | Nearest, Aligned, Back, Random, plus seam painting | Aligned (Bambu Studio source, release v02.08.04.57) |
| PrusaSlicer | Nearest, Aligned, Random, Rear, plus seam painting | Aligned (PrusaSlicer source, version 2.9.6) |
| OrcaSlicer | Aligned, Aligned Back, Nearest, Back, Random, plus seam painting and Precise Seam | Not stated in the wiki |
| Cura | Z Seam Alignment: User Specified, Shortest, Random, Sharpest Corner | Sharpest Corner (fdmprinter.def.json, 5.13.0) |
| Simplify3D | Optimized for speed, randomized, or "closest to specific location" | Not stated |
The defaults above come from each slicer's base option definitions. A printer or process profile can set its own value, so check what your profile actually uses.
What each option does
- Nearest. Prusa says Nearest tries to put the seam in a concave corner first, then a convex corner, so "if your model has sharp corners, this will make the seam effectively invisible." Bambu describes the same order and adds that it "optimizes the traveling path to minimize the impact of filament stringing." OrcaSlicer warns that Nearest "results in seams scattered around the object rather than aligned in a vertical line."
- Aligned. Prusa and Bambu say Aligned uses the same candidates as Nearest but picks the one nearest the previous layer's start point, which keeps the seam "mostly aligned throughout the whole object."
- Rear or Back. Prusa's Rear places the seam close to the back of the print bed while still trying to "avoid overhangs" and "put the seams in the corners," which it says suits "objects that will be displayed with a specific orientation." Bambu suggests Back when you want a smooth front, giving an Iron Man mask as its example.
- Aligned Back (OrcaSlicer). The OrcaSlicer wiki describes it as prioritizing "seam placement away from the front-facing side while still finding optimal hidden locations," and says it's useful for "sculptures or figurines that have a clear front view." The wiki says that Aligned Back, Aligned or Back "work the best, especially in combination with seam painting or Precise Seam modifiers."
- Random. This spreads the seam around instead of lining it up. See the next section before you choose it.
- Cura's Sharpest Corner and Seam Corner Preference. With Sharpest Corner selected, Cura's Seam Corner Preference decides which corners the seam favors. The 5.13.0 definition lists Hide Seam (the default, which favors inside corners), Expose Seam, Hide or Expose Seam, and Smart Hiding. With User Specified, Cura's Z Seam Position offers Back (the default), Back Left, Back Right, Right, Front Right, Front, Front Left, Left and Middle.
- Simplify3D. On the Layer tab of Edit Process Settings, enable "Choose start point that is closest to specific location" and enter an XY coordinate. Simplify3D's example is aligning all start points "on the backside of the model" for a statue.
Paint it by hand
When automatic placement picks the wrong spot, paint the seam. Prusa says the seam painting tool has been available since PrusaSlicer 2.3 and gives "detailed control over the seam placement." Bambu Studio has manual seam painting too, for when "the auto seam position may be not ideal." OrcaSlicer's wiki recommends combining its seam modes with seam painting or its Precise Seam modifiers.
Why random seams aren't a fix for looks
Random trades one line for many small marks. Prusa says it makes the seam less noticeable "at the cost of a less smooth surface (small zits scattered across the surface)," and that it "makes little sense" on models with corners. Bambu says Random "will cause some 'zits' effects." Polymaker says that with Random, "you will likely see ugly little blobs all over your print," and suggests Sharpest Corner instead. Prusa and OrcaSlicer both note that Random can make a part stronger, because the seam is a weak point. If those zits are your main problem, our blobs and zits guide covers them.
Step 2: Try a scarf seam on smooth, curved walls
A scarf seam ramps the start and end of the loop so they overlap, instead of butting up at one point. Prusa says scarf seams overlap the extrusions "at the end and start of the perimeter loop, hiding visible seams on smooth perimeters." Bambu, Prusa, OrcaSlicer and Cura all document it.
Bambu Studio
Bambu says Bambu Studio introduced scarf seams in version 1.9, and that from version 1.10 you can turn them on per filament in the filament settings. To control them from the process instead, go to Quality and enable Override filament scarf seam setting. That reveals Scarf seam type, with three options: None, Contour, and Contour and Hole.
Other settings Bambu documents:
- Smart scarf seam application. Bambu says it skips the scarf seam where the seam angle is "small enough to conceal the seam," and applies it where "the wall does not have a suitable sharp angle." Turn it off to apply scarf seams everywhere. The base definition in the Bambu Studio source (release v02.08.04.57) has this on by default.
- Scarf application angle threshold. The tooltip in the same source says "The default value is 155°." If the seam angle in a loop exceeds that, there's no sharp corner to hide in, so a scarf seam is used.
- Scarf start height. The nozzle height at the start of the scarf, in millimeters or as a percentage of layer height. Bambu says that "if the starting height is set to 100%, it will become an ordinary seam."
- Scarf length. Bambu says the scarf seam is disabled when the length is 0. In the v02.08.04.57 source, the base default is 10 mm.
- Scarf around entire wall. Bambu says to use this with caution, because a smaller extrusion amount around the whole loop "may cause poor adhesion between lines and result in surface defects."
- Seam placement away from overhangs (experimental). Bambu says scarf lines "may be difficult to bond properly" over overhangs, so this keeps ordinary seams in steep overhang areas.
PrusaSlicer
Prusa's seam article lists Scarf joint placement with three choices. The PrusaSlicer 2.9.6 source labels them Nowhere (the default), Contours and Everywhere. Contours applies the scarf only to the outer contour. Everywhere also covers the inner walls around holes. We found the scarf joint settings in PrusaSlicer's source from the version_2.9.0 tag onward, and not in version_2.8.1, the last release before it. That's our reading of the source, not a date Prusa gives.
- Scarf joint only on smooth perimeters is on by default in 2.9.6. Prusa says the scarf isn't applied on non-smooth surfaces "as the seam can be hidden on curves and corners of the object."
- Scarf joint length defaults to 20 mm in 2.9.6. Prusa says "using 0 in this setting disables the scarf joint."
- Scarf start height defaults to 0% in 2.9.6, which Prusa says means the scarf "begins at the same height as the current layer and ramps up to the full layer height."
- Prusa says you can check scarf seams in the preview with the Volumetric flow rate legend.
OrcaSlicer
OrcaSlicer's scarf joint options include Contour or Contour and hole, and a Conditional scarf joint that applies scarf joints "only on smooth, curved perimeters," leaving standard seams on sharp corners. The wiki's advice:
- Print scarf joints slowly: "less than 100 mm/s." If the scarf speed differs a lot from your wall speeds, it suggests enabling Extrusion rate smoothing.
- Keep Scarf joint flow ratio at 100%. Lower values "may introduce under-extrusion."
- Scarf around entire wall is "typically disabled," as it can add print time "without significant seam improvement."
Cura
Cura's definition file includes Scarf Seam Length, described as "a seam type that should make the Z seam less visible." It "must be higher than 0 to be effective," and the default is 0, so it's off unless you turn it on. Related settings are Scarf Seam Start Height and Scarf Seam Step Length. In the 5.13.0 definition, these sit in the Experimental category. We found these settings in Cura's fdmprinter.def.json from the 5.9.0 release tag onward, and not in 5.8.1, the last release before it. That's our reading of the source, not a date UltiMaker gives.
Step 3: Set the seam gap
Seam gap stops the loop slightly short of where it started, leaving room for the extra plastic that builds up at the joint.
- Bambu Studio: Bambu says "the default value is 15%" of the nozzle diameter. In the v02.08.04.57 source, this setting needs Develop mode, which Bambu says you can turn on with Ctrl+P.
- PrusaSlicer: Seam gap distance defaults to 15% in version 2.9.6. Prusa says positive values "shorten and interrupt the loop slightly," while negative values "extend the loop, causing the endpoints to overlap slightly."
- OrcaSlicer: The wiki says "a larger gap will reduce the bulging seen at the seam" while "a smaller gap reduces the visual appearance of a seam." For "a well-tuned printer with pressure advance and filament retraction, a value of 0-15% is typically optimal." It says to experiment with this only after pressure advance, travel and retraction are tuned.
Step 4: Use wipe and wall order to clean up the seam
OrcaSlicer's wiki describes two approaches: hide the seam as much as possible (scarf seams), or make the seam "as 'clean' and 'distinct' as possible" with seam gap, role-based wipe speed, wipe on loops, wipe inward and wipe before external loop. It notes that the wipe settings "do not make the seam less visible, but rather make them more consistent."
Wipe settings
- Wipe on loop (OrcaSlicer). At the end of a loop, the nozzle moves "slightly inwards towards the part," to reduce "seam unevenness by tucking in the end of the seam to the part."
- Wipe before external loop (OrcaSlicer). The de-retraction move happens slightly inside the model, so "any potential over-extrusion is hidden from the outside surface." The wiki says this matters most with Outer/Inner or Inner/Outer/Inner wall order.
- Wipe inward (OrcaSlicer). A newer option. The wiki says it's in nightly builds and "Releases greater than 2.4.2." It moves the wipe after an external wall onto the inner wall beside it, which "reduces the reheating that leaves a mark around the seam," and the wiki says this is "most noticeable at layer heights below 0.1 mm." It needs Wipe while retracting enabled and more than one wall, printed with the inner walls first.
- Role-based wipe speed. OrcaSlicer recommends turning it on so the wipe runs at the speed the feature was printed with. Bambu Studio has the same option. The v02.08.04.57 source has it on by default, and its fixed Wipe speed defaults to 80% of travel speed.
- Retract amount before wipe (Bambu Studio). Bambu's retraction page says "if it doesn't retract before wiping, the Z-seam effect on the outer wall will be better (in the case of the default inner-outer wall printing sequence)."
- Outer Wall Wipe Distance (Cura). Cura describes this as a travel move "inserted after the outer wall, to hide the Z seam better." In the 5.13.0 definition, its value is half the nozzle size.
Wall order
OrcaSlicer says wall order "plays a significant role in the appearance of a seam." Starting the outer wall right after a long travel "will always result in more visible artifacts" than printing inner walls first and traveling "just a few mm" to the outer wall. It says Inner/Outer/Inner is "typically best," followed by Inner/Outer. It also notes that Outer/Inner makes z seams "less consistent as the first extrusion of a new layer starts on a visible surface."
Bambu Lab's quick list
Bambu's common print quality page suggests these for a better seam:
- Set the number of wall loops to 3.
- Avoid printing several models on one plate, to reduce travel.
- Raise the nozzle temperature "appropriately" and lower the outer wall speed.
- For suitable simple models, use Spiral vase mode. Bambu says that prints with only a single outer wall, no infill and no top shell.
Step 5: Calibrate pressure advance
The seam is where extrusion starts and stops, so how the printer handles pressure in the nozzle shows up there. The feature is called Flow Dynamics on Bambu Lab printers, Linear Advance or Pressure Advance on Prusa printers, and pressure advance in OrcaSlicer.
- OrcaSlicer says that if you get bulges at the seam, "the first thing to tune would be pressure advance." Too low a value leaves the nozzle "still being pressurized when finishing the print move," leaving "a wider line at the end." Too high a value shows as "a larger-than-needed gap at the seam." Its pressure advance tower test says to "examine each corner and seams of the print."
- Bambu Lab says that when decelerating, "the residual pressure causes excess filament to ooze out, leading to blobs or stringing," and that its K value "is specific to a printer and filament combo."
- Prusa says the settings that affect seam visibility "are Linear Advance and Extrusion multiplier calibration." Original Prusa profiles already have them tuned. On a custom profile, Prusa suggests "lowering the extrusion multiplier and calibrating the linear advance value."
For the calibration steps and which Bambu Lab and Prusa models support which method, see our bulging corners guide. Because Prusa ties seam visibility to the extrusion multiplier too, our over-extrusion guide covers flow calibration.
Step 6: Reduce travel before the outer wall
OrcaSlicer says the biggest factor in a clean seam start is "extrusion control after a travel move." A long travel gives more chance for ooze, leaving "a small blob forming at the start of the seam" or, if too much has leaked, "a gap/under extrusion." Its suggestions:
- Keep travel speed and acceleration as high as your printer allows, so there's less time for ooze.
- Set the travel distance threshold so short moves don't trigger a retraction. The wiki suggests "2-4mm is a good starting point" if pressure advance is tuned and travel is fast.
- Enable retract on layer change, so each layer starts "under the same conditions."
OrcaSlicer also notes that hardware plays a part. It says high-flow nozzles with larger melt zones "usually have poorer extrusion control," and that "a 0.2/0.25 mm nozzle will have significantly better seam performance than a 0.4." That's a trade-off between speed and seam quality, not a reason to change nozzles on its own.
A sensible order
- Reset to your printer maker's profile for your printer, nozzle and filament.
- Decide where the seam can live: a corner, the back, or a painted line.
- Avoid Random unless you need the extra strength more than a clean surface.
- On smooth, curved walls, try a scarf seam with the slicer's default length.
- Calibrate pressure advance, linear advance or Flow Dynamics for the filament.
- Adjust seam gap in small steps after that.
- Try the wipe options and an inner-walls-first wall order.
- Cut down long travel before the outer wall.
When should you stop tuning?
Prusa says that with FDM printing "it is not possible to eliminate the seam," but "with well-tuned settings, it shouldn't be too noticeable." If the seam is a faint line at the back of a cylinder, that may be as good as it gets. For a part that must be seamless and can be printed with one wall, Prusa and Bambu both point to vase mode. Otherwise, orient the model so the seam falls somewhere it won't be seen.
If the seam comes with stringing between parts, see our stringing guide. If scarf seams struggle on steep walls, our overhangs and bridging guide covers the overhang side.
Print problems: what to check before you buy ↗Sources
- Seam settings, Bambu Lab
- Retraction (Bambu Studio parameter), Bambu Lab
- Common print quality problems and solutions, Bambu Lab
- Flow Dynamics Calibration, Bambu Lab
- Bambu Studio PrintConfig.cpp (release v02.08.04.57), Bambu Lab (Bambu Studio source)
- Seam position, Prusa Research
- Linear Advance, Prusa Research
- PrusaSlicer PrintConfig.cpp (version_2.9.6), Prusa Research (PrusaSlicer source)
- PrusaSlicer PrintConfig.cpp (version_2.9.0), Prusa Research (PrusaSlicer source)
- PrusaSlicer PrintConfig.cpp (version_2.8.1), Prusa Research (PrusaSlicer source)
- Seam settings (quality_settings_seam), OrcaSlicer project wiki
- Wall and surfaces (quality_settings_wall_and_surfaces), OrcaSlicer project wiki
- Pressure Advance calibration, OrcaSlicer project wiki
- Cura printer setting definitions (fdmprinter.def.json, 5.13.0), UltiMaker Cura project
- Cura printer setting definitions (fdmprinter.def.json, 5.9.0), UltiMaker Cura project
- Cura printer setting definitions (fdmprinter.def.json, 5.8.1), UltiMaker Cura project
- Blobs and Zits (Print Quality Guide), Simplify3D
- Blobs and Oozing, Polymaker
This page is research-based: we have not tested the products or methods ourselves. It draws on the manufacturer documentation and sources listed. Exact settings and fit always defer to your printer and filament makers.
Keep reading

Blobs and zits on the surface: seams, retraction, and pressure
Why small bumps form where each loop starts and stops, and how seam placement, retraction, wipe, coasting, and pressure advance settings reduce them.
Stringing troubleshooting: moisture, temperature, and motion settings
How to diagnose stringing and oozing one change at a time: check filament moisture, nozzle temperature, retraction, and travel settings before buying parts.

Over-extrusion: rough tops, blobs and oversized parts
Why your printer lays down too much plastic, how to tell it from a squished first layer, and how to calibrate flow in Bambu Studio, PrusaSlicer, Orca and Cura.