Over-extrusion: rough tops, blobs and oversized parts
Why your printer lays down too much plastic, how to tell it from a squished first layer, and how to calibrate flow in Bambu Studio, PrusaSlicer, Orca and Cura.
On this page (10 sections)
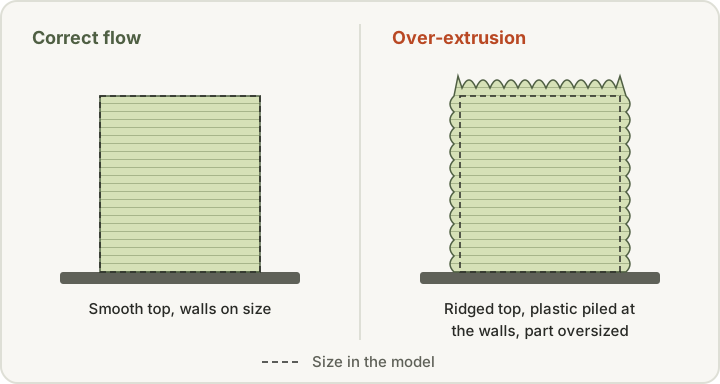
Over-extrusion means more plastic comes out of the nozzle than the slicer planned for, and the cause slicer makers point to is a flow setting (flow ratio, extrusion multiplier or Flow) set too high for your filament. It shows up as rough or ridged top surfaces, blobs, buildup along the edges, and parts that come out oversized. A filament diameter setting that doesn't match the spool, filament that varies in thickness, and a first layer squished too close to the bed can look similar. Check the diameter setting and the first layer first, then run your slicer's flow calibration and lower the value in small steps. For PrusaSlicer's extrusion multiplier, Prusa suggests adjusting by 1 to 2% at a time.
Quick checks
| Symptom | First check | Typical first change |
|---|---|---|
| Ridged tops, plastic piled at the walls, oversized all the way up | Flow setting | Run your slicer's flow calibration; lower in small steps (Prusa: 1 to 2% at a time) |
| Too much plastic on every print with a custom printer profile | Filament diameter setting | Match it to the spool (Cura's base default is 2.85 mm) |
| Only the bottom few layers flare out | First-layer height and bed temperature | Raise the first layer slightly or lower the bed temperature, within range |
| Extra plastic only at corners | Pressure advance | Run your slicer's pressure advance or flow dynamics test |
| Bulges in some sections, normal elsewhere | Filament diameter along the spool | Measure 5 to 6 points with calipers (ELEGOO) |
| Blobs and oozing as well | Nozzle temperature | Print inside the filament maker's range |
This guide is for anyone whose prints look fat rather than starved: top surfaces with raised ridges, a lip of plastic piled up at the walls, holes that come out too small, or parts that won't fit together. It covers what over-extrusion looks like, how to tell it from a squished first layer and other look-alikes, and how Bambu Lab, Prusa, OrcaSlicer, UltiMaker Cura and Simplify3D document flow adjustment in their own software. If your prints have gaps instead, see our under-extrusion guide.
What does over-extrusion look like?
Simplify3D explains that "most 3D printers have no way of monitoring how much plastic is actually extruded," so if extrusion settings are off, "the printer may extrude more plastic than the software expects." It says the excess plastic "can ruin the outer dimensions of your part."
The makers describe the same signs in slightly different words:
- Prusa: over-extrusion "causes scarring of bottom layers and unnecessary material buildup on top layers." Prusa adds that it's "especially problematic when you're trying to glue two parts of the model," because an over-extruded top layer leaves "an uneven surface."
- Bambu Lab: too high a flow rate gives "blobs or lines that overlap too much." Signs it lists include "excess material on your printed object, forming blobs or zits," or layers that "seem too thick." On top layers, it says over-extrusion "will produce uneven lines."
- OrcaSlicer: a flow ratio that's too high causes "excess material, rough surfaces, and dimensional inaccuracies."
- Polymaker: over-extrusion is "generally easier to detect with the naked eye than under-extrusion," with signs such as "blobs, stringing, or excessively thick layers," and "raised ridges between surface lines." The print "may look messy or oversized."
Over-extrusion or something else?
Several problems leave extra plastic in one place. Where it appears is the best clue.
| What you see | Points more toward |
|---|---|
| Ridged or rough top surfaces, plastic piled up along the walls, parts oversized all the way up | Flow set too high (this guide) |
| Only the bottom few layers flare out, then the walls look normal | A first layer set too close to the bed, or elephant's foot. See our elephant's foot guide |
| Extra or missing plastic only at corners, where the toolhead speeds up and slows down | Pressure advance (Bambu Lab) |
| Bulges or uneven lines in some sections, normal elsewhere | Filament diameter varying along the spool (ELEGOO) |
| Hairs, oozing and blobs where the nozzle travels | Temperature or retraction. See our stringing guide and blobs and zits guide |
The corner case comes from Bambu Lab's under-extrusion article, which says "an incorrect pressure advance value may cause too much or too little extrusion at the moment the print head changes speed." For that, Bambu points to its Flow Dynamics Calibration rather than the flow rate.
Step 1: Start from the maker's profile and a clean extruder
Before changing flow, make sure you're starting from a sensible baseline.
- Use the profile for your printer, nozzle and filament. Bambu Lab says "every slicer profile comes with a pre-configured flow ratio set according to the filament used," and that its own filaments "are tuned and should provide a good surface finish." For genuine Bambu filaments, it recommends "keeping the default flow ratio and avoid changing it arbitrarily."
- Don't calibrate unless you need to. Prusa says extrusion multiplier calibration "is not necessary with a new printer coming from the factory," and calls it "an advanced calibration, recommended only to experienced users." It says the ideal value "is different for every type of material and every color" and "can even differ from spool to spool."
- Rule out other calibrations first. Bambu says not every defect comes from an inaccurate flow rate, and suggests flow rate calibration once you've "already performed other calibrations, such as Flow Dynamics Calibration, but issues persist."
- Clean the hotend and extruder. Bambu says to "avoid calibrating with a dirty extruder or a nozzle that is partially clogged," because these "can significantly skew the calibration process." It also says to dry the filament thoroughly before calibrating and to wash the build plate first.
Step 2: Check the filament diameter setting
Simplify3D's advice for over-extrusion is to check the same settings it lists for under-extrusion, "just in the opposite direction." The first of those is "that the software knows the filament diameter that you are using." It says "the most common values for the filament diameter are 1.75mm and 2.85mm," and that many spools show the diameter on the packaging. In Simplify3D, the setting is under Edit Process Settings, on the Other tab.
Cura's Diameter setting says to "match this value with the diameter of the used filament." Note that the default in Cura's base printer definition (fdmprinter.def.json) is 2.85 mm. Printer-specific profiles can set their own value, but if you've built a custom printer profile, check it. Our guide to 1.75 vs 2.85 mm filament explains how to find your printer's size.
Step 3: Check the filament itself
No spool is exactly the nominal diameter along its whole length. Prusa gives the industry standard for variation as "+/- 0.05 mm," and says some filaments vary in thickness "due to quality or infused materials like wood, which will cause unexpected changes in the volume of extruded filament." ELEGOO says its PLA and PETG are typically within ±0.02 mm.
ELEGOO's diameter inspection guide lists "localized under-extrusion, bulging, or abnormal layer lines" among the signs of filament out of tolerance. Its check, in short:
- Pull out about 1 meter of filament and mark 5 to 6 points, roughly every 15 to 20 cm.
- Measure each point twice with digital calipers, rotating the filament 90° between readings, to catch filament that's oversized, undersized or oval.
- If only a short section is out of tolerance, cut it out and keep monitoring. If several sections vary significantly, ELEGOO says to stop using that roll.
ELEGOO also warns that if the diameter "varies randomly at different positions, adjusting the filament diameter setting or flow ratio in the slicer cannot accurately compensate." In that case flow calibration won't help, and a different spool is the fix.
Step 4: Check the temperature
Polymaker says the right printing temperature is material-dependent and that misconfigured temperatures can lead to "surface defects such as matte finishes or blobs." For printing too hot, it lists symptoms of "stringing, oozing, degraded material properties, clogs," and the fix as lowering the nozzle temperature and making sure cooling is adequate.
Those symptoms overlap with over-extrusion, so check that you're printing inside the filament maker's recommended range before you calibrate flow. Run any flow test at the temperature you normally print at, so the result matches real prints.
Step 5: First-layer squish or over-extrusion?
A first layer printed too close to the bed spreads plastic sideways, and that can look like over-extrusion at the base of a part.
- Polymaker: when "the first layer has the nozzle too close to the build plate, material is built up, smashed out, and presents itself as thicker than the dimensions of the actual part." It says the flare tends to correct itself "after about 5-10 layers," though the bottom stays the wrong size. A bed that's too hot for the material can cause the same flare.
- Bambu Lab: describes elephant's foot as the bottom of the model being "wider than the layers above it," caused by heat from the bed and the weight of upper layers pressing on a base that hasn't set. Bambu Studio has an Elephant foot compensation setting under Process, Quality, Precision.
- Prusa: if the nozzle is too close to the surface, "the filament won't be able to 'flow out' leading to a potential clog of the nozzle." On Prusa printers, Live Adjust Z fine-tunes the first-layer height. In PrusaSlicer, Printer settings, General, Z offset does the same per G-code file, where "a negative value means a more squished first layer."
The rule of thumb that follows from these: if the extra plastic is only on the first few layers, look at first-layer height and bed temperature. If it runs all the way up the walls and shows on the top surface, look at flow. Our elephant's foot guide covers the first case in detail.
Step 6: Calibrate flow in your slicer
Every slicer has a setting that scales how much plastic is extruded. The names differ:
| Slicer | Setting name | Where it lives |
|---|---|---|
| Bambu Studio | Flow ratio | Filament preset, plus a Calibration tab with a Flow Rate test |
| PrusaSlicer | Extrusion multiplier | Filament Settings, Filament |
| OrcaSlicer | Flow ratio | Filament settings, plus a Calibration menu with a Flow ratio test |
| Cura | Flow (with separate Wall, Top/Bottom, Infill and Initial Layer Flow) | Material settings |
| Simplify3D | Extrusion multiplier | Edit Process Settings, Extruder tab |
Change one thing at a time and save the result to the filament profile, since makers say the right value varies by filament.
Bambu Studio
Bambu Lab's Flow Rate Calibration is under Calibration, Flow Rate. It has two modes:
- Auto-Calibration. Bambu's flow rate calibration article says "only X1 series support Auto calibration." If you own a newer Bambu model, check the calibration options Bambu Studio offers for it. On the X1, auto calibration uses the printer's Micro Lidar to measure printed lines and returns a recommended flow ratio. Bambu says this method may not suit filaments that are "transparent or semi-transparent, sparkling particles, or have a high-reflective finish," including silk and marble PLA.
- Manual Calibration. Coarse calibration prints blocks from 80% to 120% of the preset's flow ratio in 5% steps. Fine calibration prints blocks from 91% to 100% of a value you set, in 1% steps. Pick the smoothest block. Bambu says top samples in its example were rejected because "the flow rate is too high, resulting in overlapping printed lines," and warns against choosing a sample with slight under-extrusion, because on larger prints it "can increase, leading to potential gaps between the printed lines."
For fine-tuning by hand, Bambu's X1 article suggests slicing a test model at different flow values and changing it in small increments, noting that "a change of ±0.03 to ±0.05 can produce a significant difference in the top layer quality."
PrusaSlicer
PrusaSlicer's Extrusion Multiplier is in Filament Settings. Prusa says the default for PLA is 1 (100%) and "usually, the adjusted values can be between 0.9 and 1.1." It offers two methods:
- Visual method. Print Prusa's test cube with the default Prusa PLA presets at 0.20 mm layer height and inspect the top by eye and with a fingertip. The goal is a top that's "smooth, shiny, and without scarring or filament buildup near the perimeters." If there's "too much material near the perimeters," decrease the extrusion multiplier. Prusa suggests adjusting it by 1 to 2% at a time.
- Precise method. Print Prusa's cube in Spiral vase mode, measure each wall at least three times, and divide the extrusion width (0.45 mm in the default 0.4 mm nozzle profiles) by the average wall thickness. Prusa warns that "cheap digital calipers may not be accurate enough" to measure a single wall, and that other nozzle sizes or layer heights above 0.2 mm need different values.
Prusa also notes that the printer's own Flow setting (in the Tune menu during a print) and PrusaSlicer's extrusion multiplier "are two ways to adjust the same thing," and that total flow is the two multiplied together. If you've changed one, check the other.
OrcaSlicer
OrcaSlicer's flow ratio test is in the Calibration menu, under Flow ratio. Its wiki recommends the "Archimedean chords + YOLO" method:
- Select the printer and the exact filament, because the test "is based on the filament's current flow ratio."
- Choose YOLO (Recommended). OrcaSlicer generates eleven blocks, each with a different flow ratio modifier. The recommended range is -0.05 to +0.05 in steps of 0.01.
- Pick the block with the smoothest top surface, no visible gaps, and "minimal or no visible line" between the inner spiral and outer arcs. The inner spiral prints last so you can check for material accumulation where they meet.
- Add or subtract the modifier from your old value. OrcaSlicer's example: 0.98 with a chosen modifier of +0.01 becomes 0.99. Save the filament profile.
A legacy 2-Pass method is also available. OrcaSlicer warns Bambu Lab owners: "Make sure you do not select the 'Flow calibration' option."
Cura
Cura's base definition describes Flow as "flow compensation: the amount of material extruded is multiplied by this value," with a default of 100%. Wall Flow, Top/Bottom Flow and Infill Flow inherit that value by default, and Initial Layer Flow sets the first layer separately, also at 100% in the base definition. Cura shows a warning above 150% and below 50%.
The UltiMaker sources we reviewed don't describe a built-in flow calibration print for Cura. Lowering Flow in small steps and comparing the top surface of the same test print is the approach the other makers above describe. If only the first layer looks over-extruded, check Initial Layer Flow and your first-layer height before changing the main Flow value.
Simplify3D
Simplify3D's extrusion multiplier is per extruder, on the Extruder tab of Edit Process Settings. It gives the example that changing 1.0 to 1.05 "means you will be extruding 5% more plastic," and says "it is typical for PLA to print with an extrusion multiplier near 0.9, while ABS tends to have extrusion multipliers closer to 1.0." For over-extrusion, it says to "decrease the extrusion multiplier."
Calibrating didn't help?
If you've lowered flow and the problem stays, go back to the look-alikes:
- Only the corners bulge. Run your slicer's pressure advance or flow dynamics test. Bambu's under-extrusion article covers this for its printers.
- Some sections bulge, others don't. Measure the filament as in Step 3. ELEGOO says slicer settings can't accurately compensate for random variation.
- Only the base flares. Raise the first layer slightly or lower the bed temperature, within the material's range.
- Quality dropped after it used to be fine. Bambu suggests cleaning the extruder and nozzle "before considering recalibration," and says a new nozzle can confirm whether the problem is the nozzle or the calibration. Our worn nozzle guide covers the signs of a worn nozzle, and the replacement nozzles shortlist helps if you do need a new one.
A sensible order
- Confirm it's over-extrusion: extra plastic on walls and tops, not just the base or corners.
- Reset to your printer maker's profile for your printer, nozzle and filament.
- Check the filament diameter setting matches the spool.
- Measure the filament at a few points if bulges come and go.
- Check the nozzle temperature is inside the filament maker's range.
- Check the first layer isn't squished too close.
- Clean the nozzle and extruder, then run your slicer's flow calibration and save the result to the filament profile.
Write down each change and its result. If your tops have holes rather than ridges, see our guide to gaps in top layers and our pillowing guide.
Print problems: what to check before you buy ↗Sources
- Over-Extrusion (Print Quality Guide), Simplify3D
- Under-Extrusion (Print Quality Guide), Simplify3D
- Over Extrusion vs. Under Extrusion, Polymaker
- Printing Temperature, Polymaker
- Elephant Foot (Smooshed First Layer), Polymaker
- Extrusion multiplier calibration, Prusa Research
- Under-extrusion, Prusa Research
- Live adjust Z, Prusa Research
- Flow Rate Calibration (Bambu Studio), Bambu Lab
- Manual Flow Rate Tuning for better looking prints, Bambu Lab
- Notes for Automatic Flow Rate Calibration, Bambu Lab
- Under-Extrusion, Bambu Lab
- Elephant foot (Bambu Studio parameter), Bambu Lab
- Flow Ratio Calibration, OrcaSlicer project wiki
- Cura printer setting definitions (fdmprinter.def.json), UltiMaker Cura project
- Filament Diameter Inspection Guide, ELEGOO
This page is research-based: we have not tested the products or methods ourselves. It draws on the manufacturer documentation and sources listed. Exact settings and fit always defer to your printer and filament makers.
Keep reading

Under-extrusion troubleshooting: gaps, thin walls, and weak layers
Find why your printer lays down too little plastic: check filament, temperature, flow and speed settings, and the feed path before buying parts.

Elephant's foot: why the bottom of a print flares out, and how to fix it
Why the first layers of a print bulge outward, and how to check Z offset, bed temperature, and slicer compensation one change at a time.

Blobs and zits on the surface: seams, retraction, and pressure
Why small bumps form where each loop starts and stops, and how seam placement, retraction, wipe, coasting, and pressure advance settings reduce them.